User guide
- 1. Introduction
- 2. Quick start
- 3. About
-
4. Features
- 4.1. Setting Up
-
4.2. Attendance taking
- 4.2.1. Mark all students as present:
markpresent all - 4.2.2. Mark a student as present:
markpresent - 4.2.3. Mark a student as absent:
markabsent - 4.2.4. Mark all students as absent:
markabsent all - 4.2.5. Flag attendance of a student:
flagatt - 4.2.6. Unflag attendance of a student:
unflagatt - 4.2.7. Export attendance as XLSX file:
exportatt
- 4.2.1. Mark all students as present:
- 4.3. Participation marking
- 4.4. Question addressing
- 4.5 Utility viewing
- 5. FAQ
- 6. Command summary
1. Introduction
(Contributed by Chun Yong)
![]()
Welcome to the User Guide of Serenity!
Are you a tutor teaching CS2101 in NUS? Do you struggle to keep track of students’ attendance and class participation on many different excel sheets for different lessons? Do you also tend to forget to address questions students asked during lessons? Fret not, our application, Serenity, will help keep you sane when managing tutorial groups.
Serenity is a desktop application that helps CS2101 tutors manage their lessons. This application is optimized for use through a Command Line Interface (CLI), meaning that you operate the application by typing commands into a command box. This application also has a Graphical User Interface (GUI), where you can interact with the application through graphical icons such as buttons.
This user guide serves to provide you with an in-depth documentation on how to set up and use our application. With that said, let’s get started!
2. Quick start
(Contributed by Chun Yong)
To get started with using Serenity, you can follow these steps:
-
Ensure you have Java
11or above installed in your Computer. -
Download the latest
Serenity.jarfrom here. -
Copy the file to the folder you want to use as the home folder for your Serenity application.
-
Double-click the file to start the app. The GUI similar to the image below should appear in a few seconds.
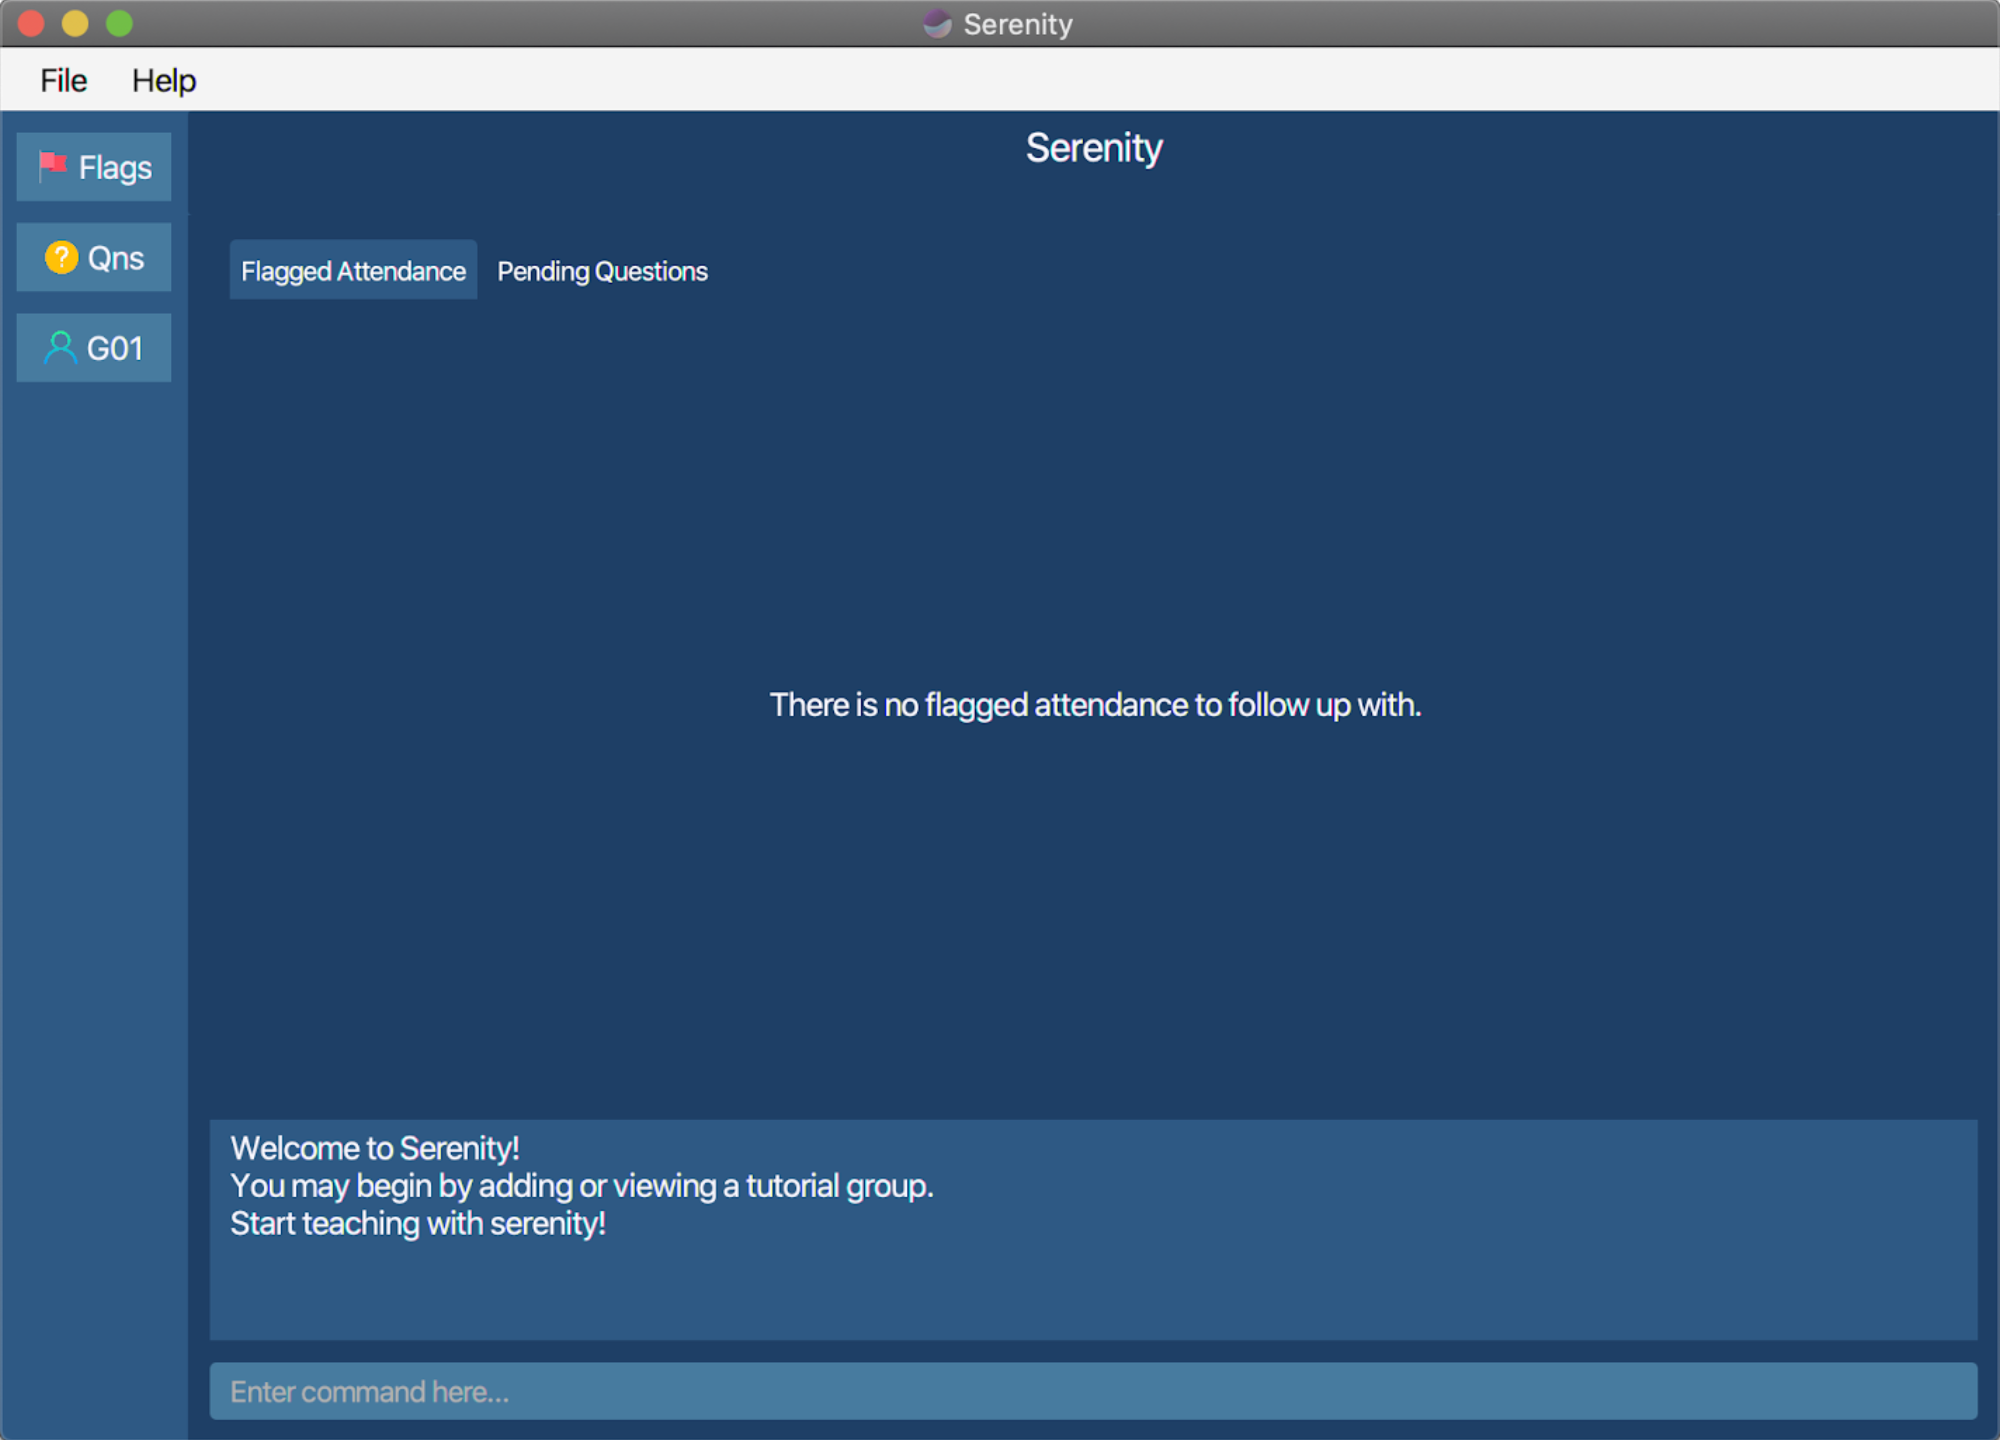 Figure 2.1 Welcome screen.
-
Type the command in the Command Box and press
Enterto execute it. -
Refer to the Features below for details of each command.
3. About
(Contributed by Rui En)
3.1. Structure of this document
This User Guide have been structured such that you can easily find what you need.
In Section 3.2, you can find useful tips on reading this document.
In Section 4, you can find details of the main features of Serenity:
- Setting up
- Attendance taking
- Participation marking
- Question addressing
- Utility viewing
3.2. Reading this document
In this subsection, you can find the explanation of the technical terms, symbols and syntax that are used in this User Guide.
3.2.1. Terminology related to the GUI
The following figure shows the GUI of Serenity. It is annotated with the name of the GUI components.
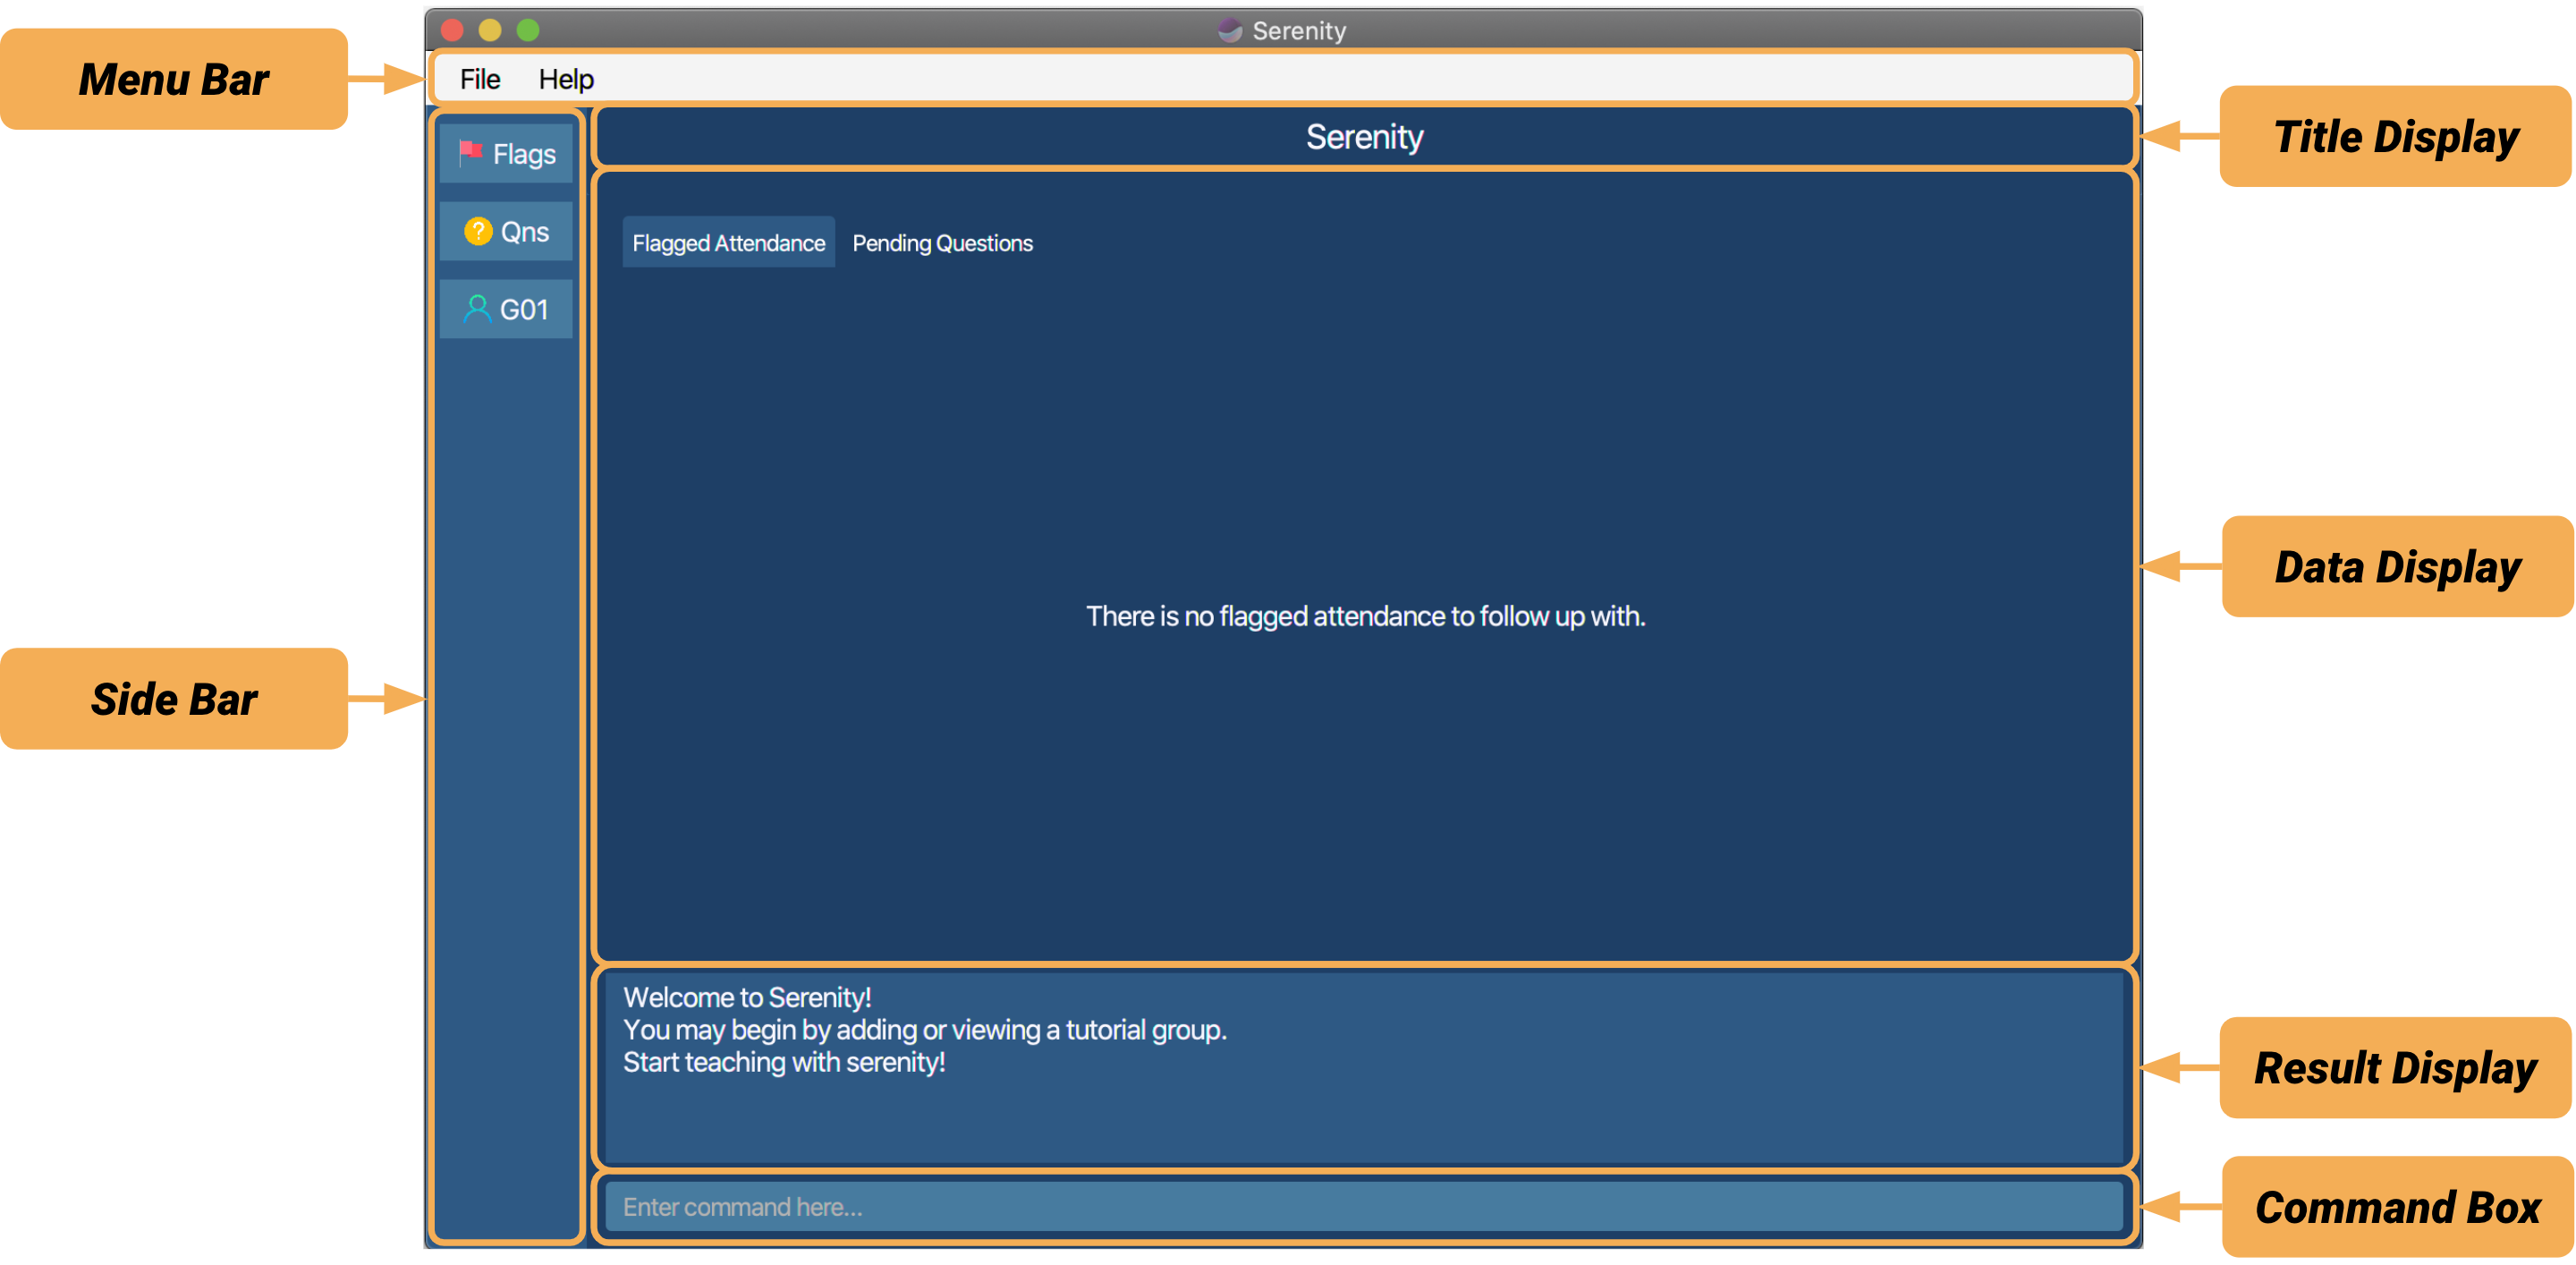 Figure 3.2.1.1 Annotated GUI of Serenity.
What the 6 main components of the GUI do:
-
Menu Bar: This is where you can access our User Guide and exit the application.
-
Side Bar: This is where you can easily access flagged attendance records, pending questions and existing tutorial groups.
-
Title Display: This is where Serenity displays the title of the page that you are viewing.
-
Data Display: This is where Serenity displays the information of the page that you are viewing.
-
Result Display: This is where Serenity displays guiding messages.
-
Command Box: This is where you type your commands.
3.2.2. Layout of the GUI
(Contributed by Wen Jin)
Serenity is divided into these 3 pages:
- Home page
- Tutorial group page
- Tutorial lesson page
Home page
This is the default page shown when you start Serenity. This page consists of:
-
Flagged attendance tab: this tab contains the names of students whose attendance have been flagged with the
flagattcommand. Flagging a student’s attendance serves as a reminder on the first page of the app for you to check on the student and perform any follow-up actions, if necessary. -
Pending questions tab: this tab shows the questions asked by students across all your tutorial groups, providing a convenient place for you to keep track of all the questions asked by students across your tutorial groups and lessons.
 Figure 3.2.2.1 Home page of Serenity.
Tutorial group page
This page shows the information related to a tutorial group you are teaching. This page consists of:
-
Lessons tab: this tab allows you to view the list of lessons scheduled for this group.
-
Students tab: this tab displays the list of students belonging in this group. You may modify this list, especially at the start of each semester where there will be students entering the module, appealing into the module, switching between tutorial groups, and even dropping the module.
-
Attendance tab: this tab shows the attendance sheet of the students. You may view the attendance records of all the students in the tutorial group across all the tutorial lessons.
-
Participation tab: this tab shows the participation score sheet of the students. Similarly, you may view the class participation grades of all the students in the tutorial group across all the tutorial lessons.
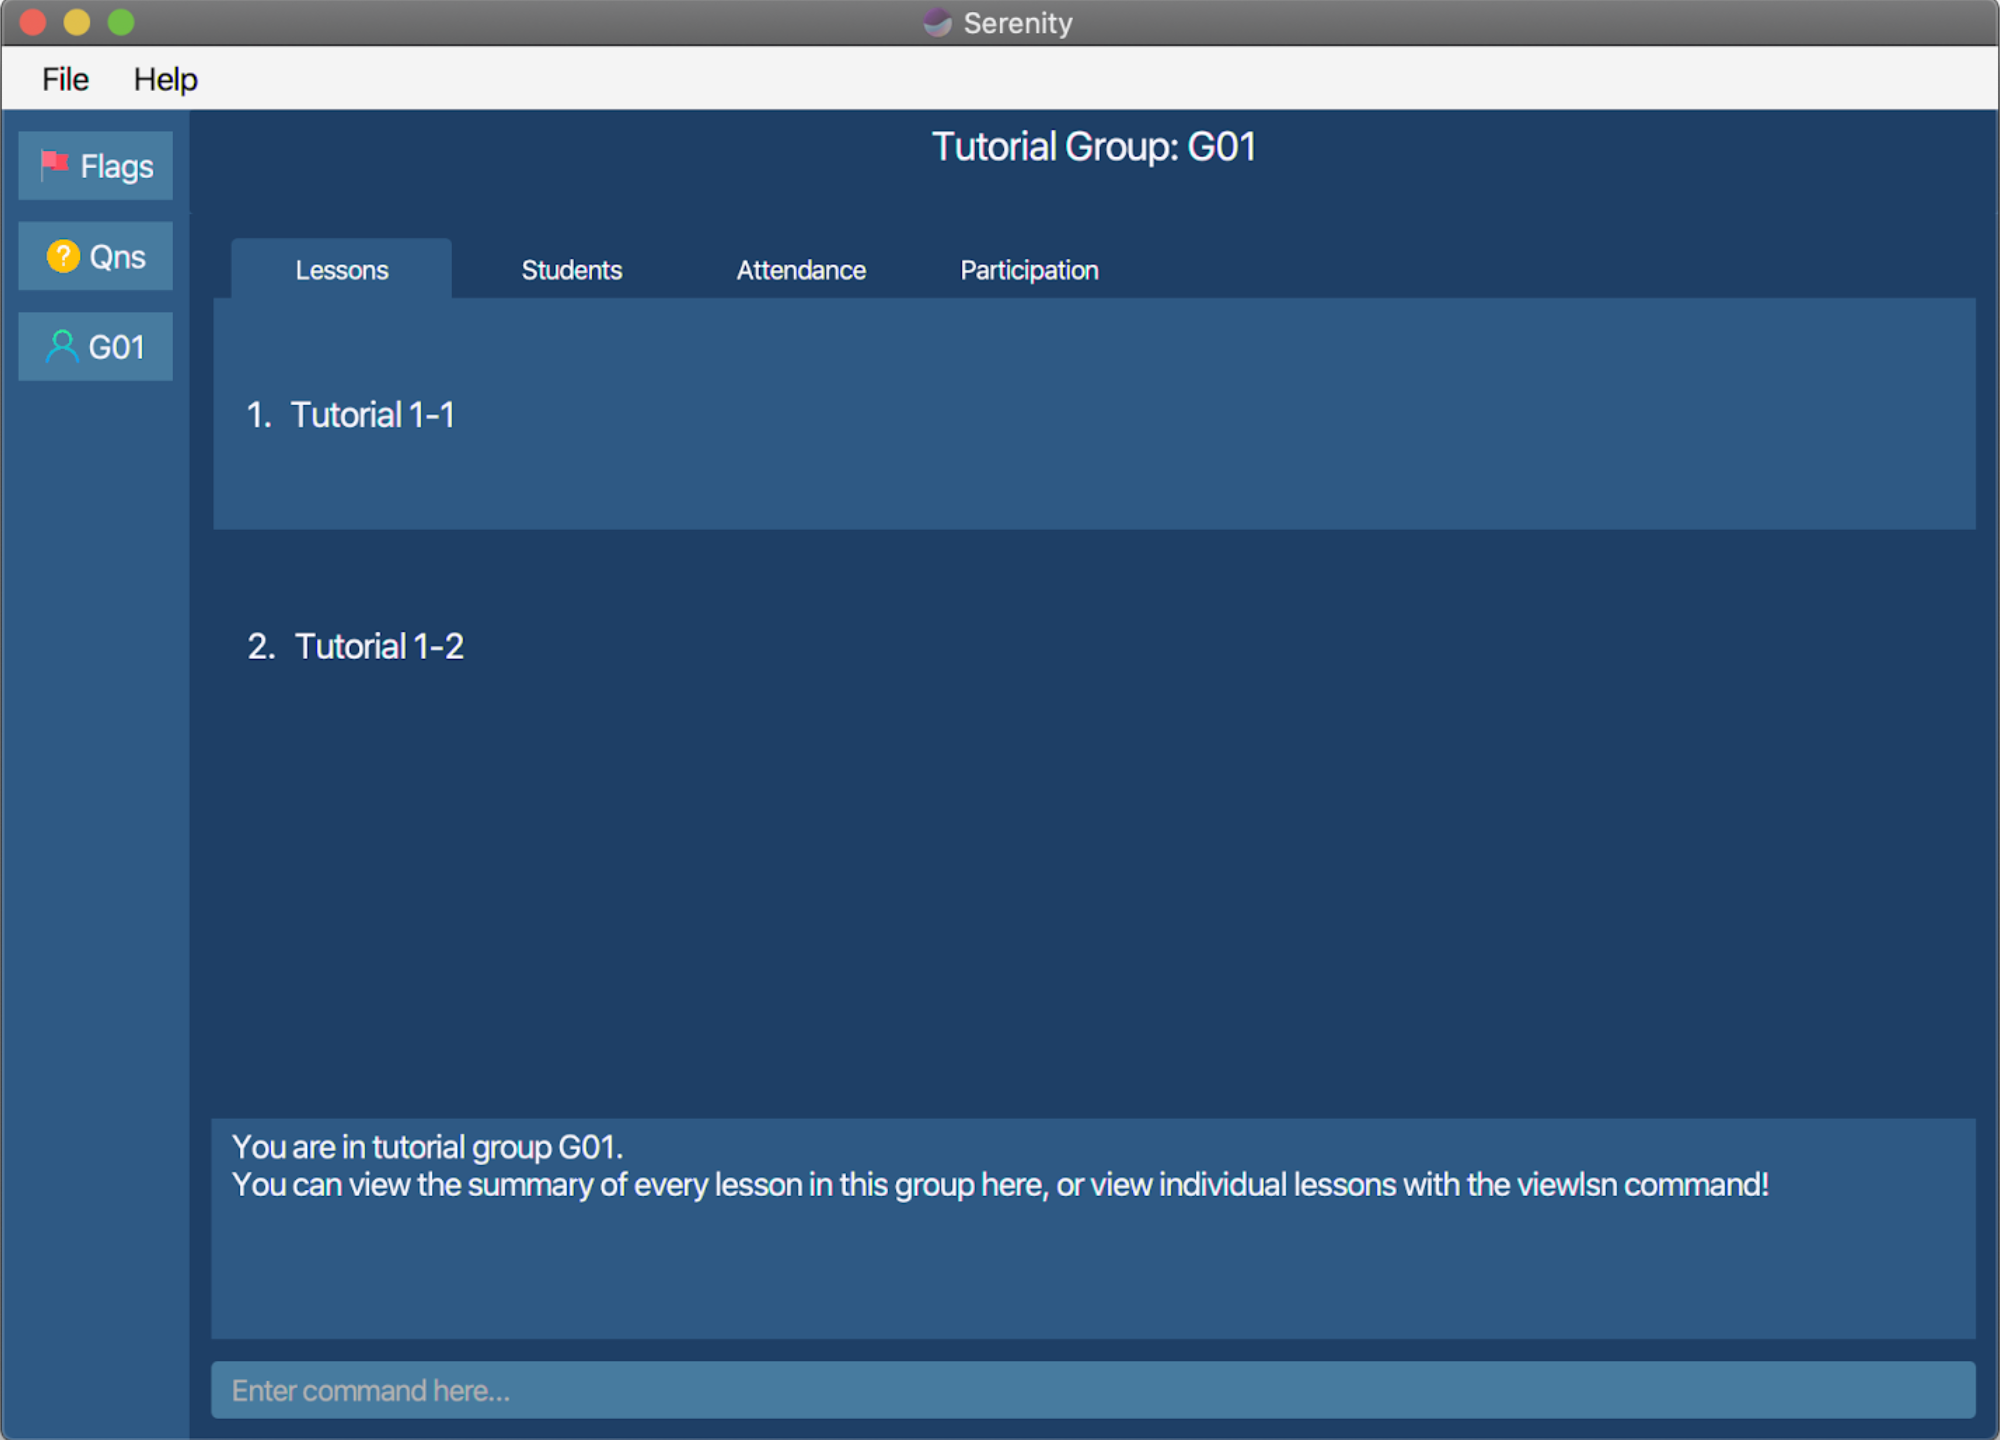 Figure 3.2.2.3 Group page of Serenity.
Tutorial lesson page
This page shows the records for a specific lesson. This page consists of:
-
Students tab: this tab contains the list of students in the tutorial group. For each student, you may view and change the student’s attendance and participation grades. You may also flag the student’s attendance if necessary.
-
Questions tab: this tab contains the list of questions that were asked during this tutorial lesson. In this tab, you may add, edit, find or delete a question that was asked during this tutorial lesson.
 Figure 3.2.2.4 Lesson Page of Serenity.
3.2.3. General symbols and syntax
(Contributed by Rui En)
The table below explains the general symbols and syntax used throughout the document.
| Symbol/syntax | Meaning |
|---|---|
command |
This indicates a technical term, which you can find out more in Command syntax and usage. |
| GUI | This indicates a graphical component, such as a button, layout format and text input box. |
| This indicates a note. | |
| This indicates a tip. | |
| This indicates a warning. |
3.2.4. Command syntax and usage
(Contributed by Rui En)
The table below explains some important technical terms.
| Technical term | Meaning |
|---|---|
| Command | The instruction that the user types into the command box for Serenity to perform a specific task. |
| Command word | The first word of the command that tells Serenity which task should be performed. |
| Parameter | The word or phrase following the command word that provides further details of the task (if necessary). |
| Prefix | The letter that is placed at the start of each parameter to distinguish one parameter from another. |
| XLSX | The excel file format that Serenity handles for imports and exports. |
3.2.5. Command format
You can use commands to tell Serenity to perform a specific task.
Format:
COMMAND_WORD prefix/PARAMETER
![]() Note: Words in upper case are the parameters to be supplied by you.
Note: Words in upper case are the parameters to be supplied by you.
e.g. in viewgrp grp/GROUP_NAME, GROUP_NAME is a parameter which can be used as viewgrp grp/G01
Example:
If you need to add a new tutorial lesson, you can type the following command.
addlsn grp/GROUP_NAME lsn/LESSON_NAME
Analysis:
-
Command: Add a tutorial lesson
-
Command Word:
addlsn -
Parameter:
GROUP_NAME,LESSON_NAME -
Prefix:
grp/,lsn/
4. Features
(Contributed by Rui En and Wen Jin)
This section contains all the information you need to know about the features of Serenity. To use each feature or sub-feature, you will need to enter the command into the Command Box. Below is an overview of the features available in Serenity :
- Setting up feature provides you the tools to set up your tutorial groups and lessons.
- Attendance taking feature provides you the tools to mark attendance for your lessons.
- Participation marking feature provides you the tools to grade student participation.
- Question addressing feature provides you the tools to keep track of questions asked by students.
- Utility viewing feature provides you the tools to view the information of the above features.
4.1. Setting Up
(Contributed by Chun Yong)
It is the start of the semester! Brand-new classes, brand-new students and a whole new experience. Follow the instructions below to set up your new classes, and watch Serenity do the magic for you.
4.1.1. Add a new tutorial group from XLSX file: addgrp
(Contributed by Rui En)
You can use this command to add a new tutorial group automatically from XLSX data.
(Contributed by Ryan)
![]() Notes regarding the
Notes regarding the addgrp command:
- A sample XLSX file can be found here
- The XLSX file should store a list of students.
- The list of students you are importing cannot exist in another tutorial group.
- The format of the XLSX file should be the same as the XLSX file that you may download from LUMINUS. Examples of valid and invalid file formats can be found in the XLSX file format documentation
- To obtain the PATH_TO_XLSX, either:
- Get the location of the XLSX file in your computer.
e.g.addgrp grp/G04 path/C:\Users\serene\CS2101_G04.xlsx
- Copy and paste the XLSX file into the same folder as your Serenity application, then type the name of the XLSX file.
e.g.addgrp grp/G04 path/CS2101_G04.xlsx
- Get the location of the XLSX file in your computer.
![]() Tip for the
Tip for the addgrp command:
After adding a tutorial group, a button will be created. It allows you to easily navigate to the group in the future,
as pressing the button equals to typing the viewgrp grp/GROUP_NAME command.
Format:
addgrp grp/GROUP_NAME path/PATH_TO_XLSX
![]() Warning:
GROUP_NAME follows the format ‘XYY’ where X is an alphabetical character and Y is a digit from 0 to 9.
Warning:
GROUP_NAME follows the format ‘XYY’ where X is an alphabetical character and Y is a digit from 0 to 9.
Example:
You are adding a new tutorial group named G04 to prepare for a new semester.
The XLSX data of the tutorial group is stored in the same folder with the Excel file named CS2101_G04.xlsx.
Adding a new tutorial group:
- Type
addgrp grp/G04 path/CS2101_G04.xlsxinto the Command Box. - Press
Enterto execute.
Outcome:
- The Result Display will show a success message.
- At the same time, a new button named
G04will be created in the Side Bar. -
Serenity will switch to tutorial group
G04page. - You can now see the list of students and a default list of tutorial lessons for tutorial group
G04.
 Figure 4.1.1.1 Command for
 addgrp command.
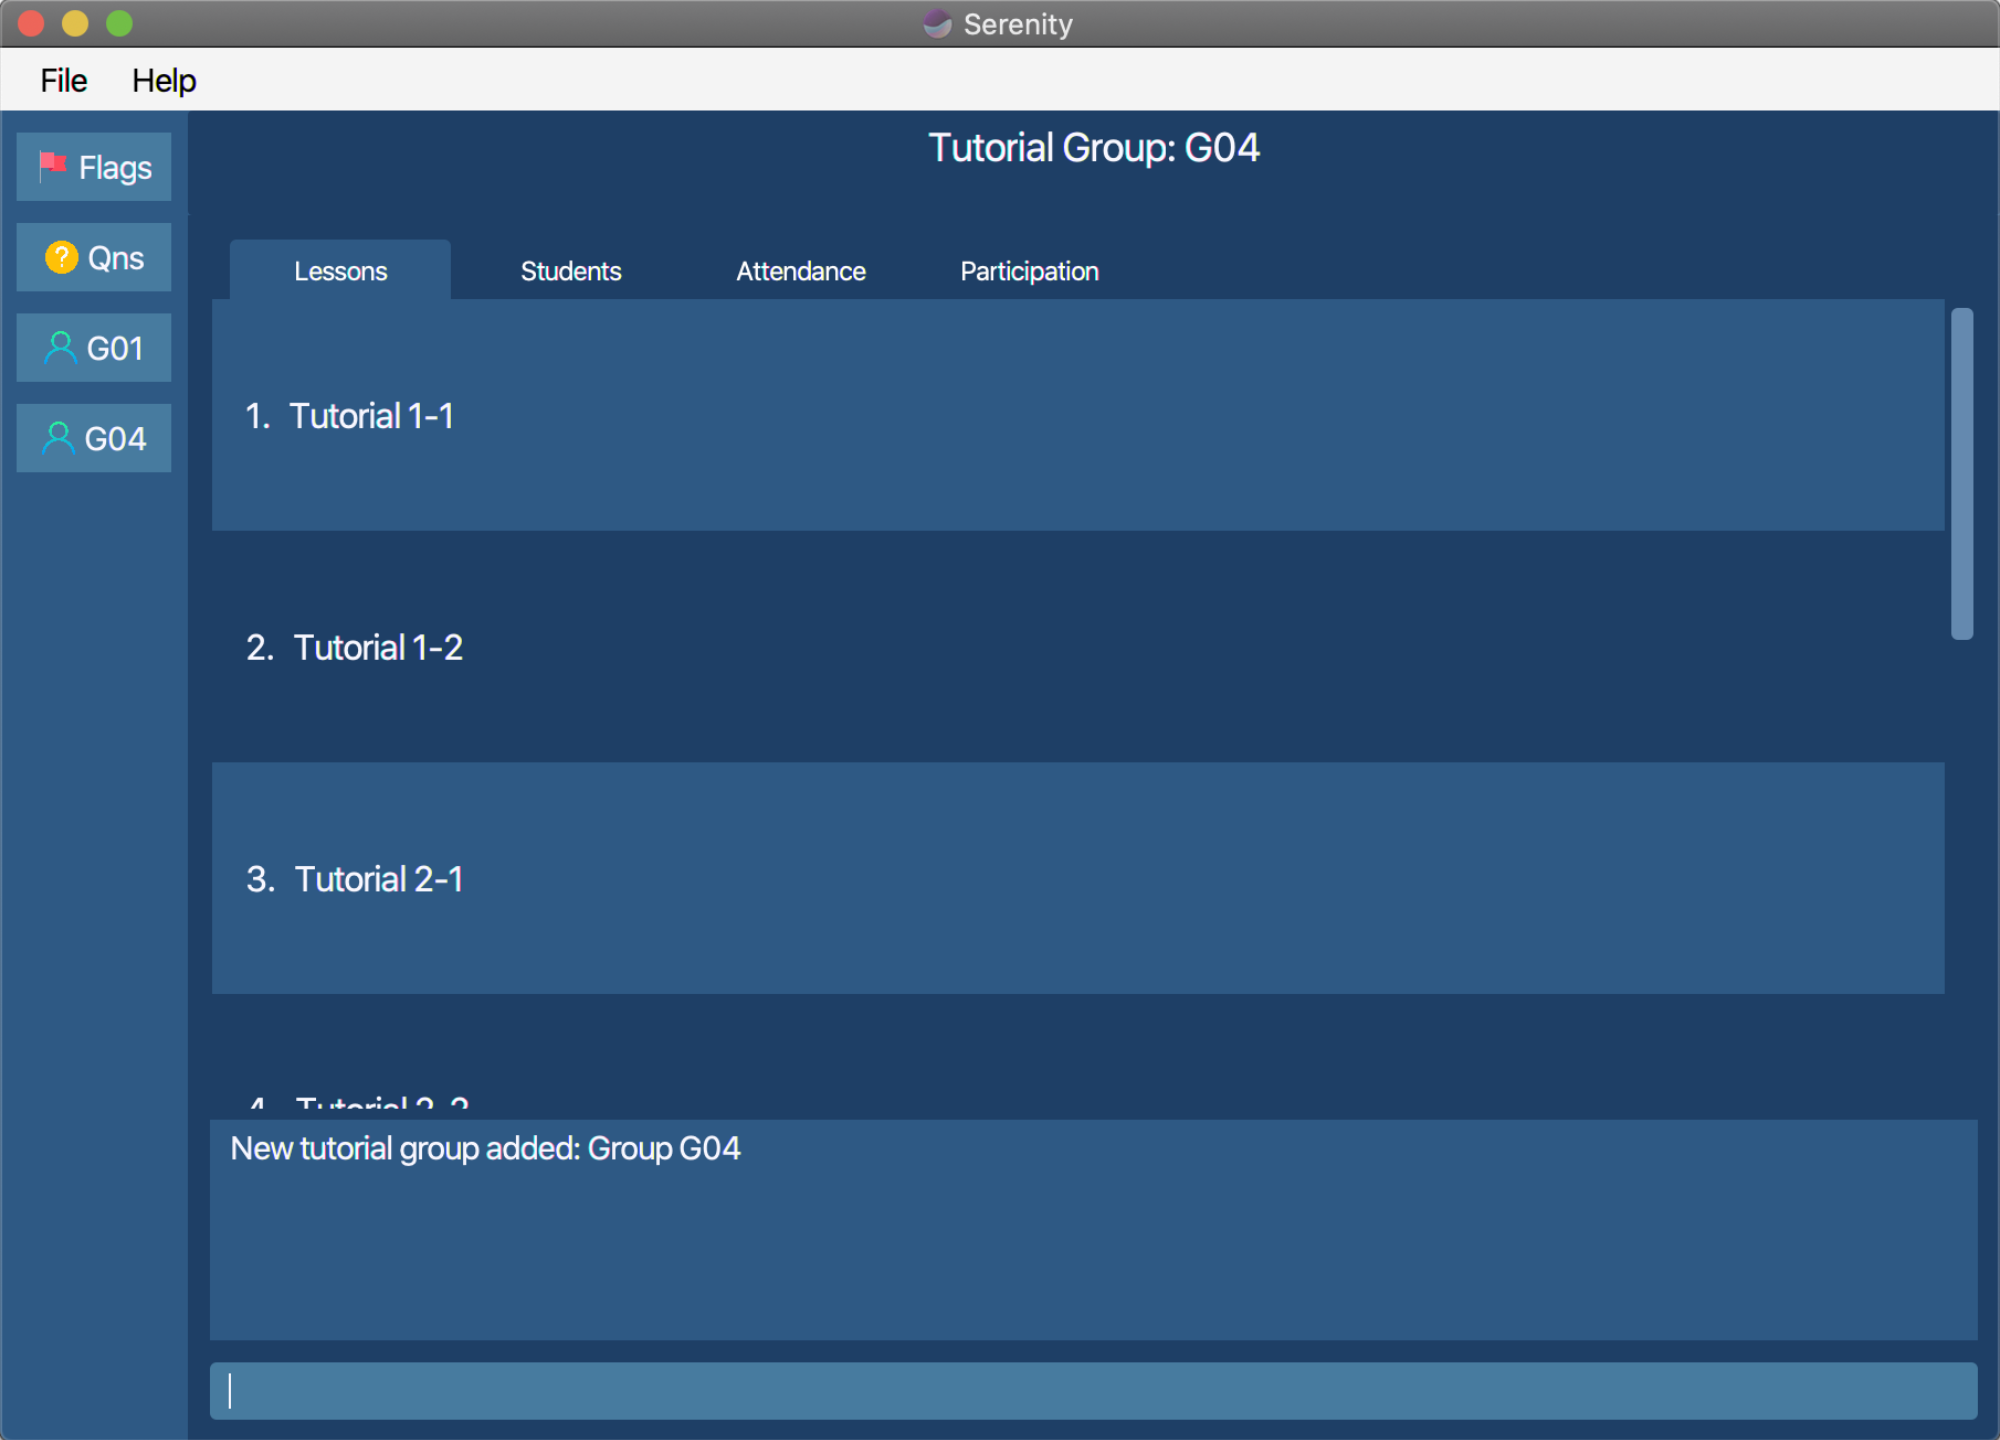 Figure 4.1.1.2 Screen displayed when the
 addgrp command is successfully executed.
4.1.2. Delete an existing tutorial group: delgrp
(Contributed by Rui En)
You can use this command to delete an existing tutorial group.
![]() Notes regarding the
Notes regarding the delgrp command:
After deleting a tutorial group, the button named after the tutorial group will be deleted as well.
Format:
delgrp grp/GROUP_NAME
Example:
You accidentally added the wrong tutorial group G01 and you decided to remove the tutorial group.
Deleting an existing tutorial group:
- Type
delgrp grp/G01into the Command Box. - Press
Enterto execute.
Outcome:
- The Result Display will show a success message.
- The button named
G01will be removed from the Side Bar. -
Serenity will exit tutorial group
G01page. - You can now see that tutorial group
G01no longer exists.
4.1.3. Add a new tutorial lesson: addlsn
(Contributed by Ryan)
You can use this command to add a new tutorial lesson for a specified tutorial group.
Format:
addlsn grp/GROUP_NAME lsn/LESSON_NAME
![]() Warning:
LESSON_NAME follows the format ‘XX-Y’ where X is the week number, and Y is the lesson number.
Warning:
LESSON_NAME follows the format ‘XX-Y’ where X is the week number, and Y is the lesson number.
Example:
You want to create a new tutorial lesson called 1-3 (week 1, lesson 3) for tutorial group G01.
Adding a tutorial lesson to a tutorial group:
- Type
addlsn grp/G01 lsn/1-3into the Command Box. - Press
Enterto execute.
Outcome:
- The Result Display will show a success message.
-
Serenity will display tutorial lesson
1-3page. - You can now see that tutorial lesson
1-3has been added to tutorial groupG01.
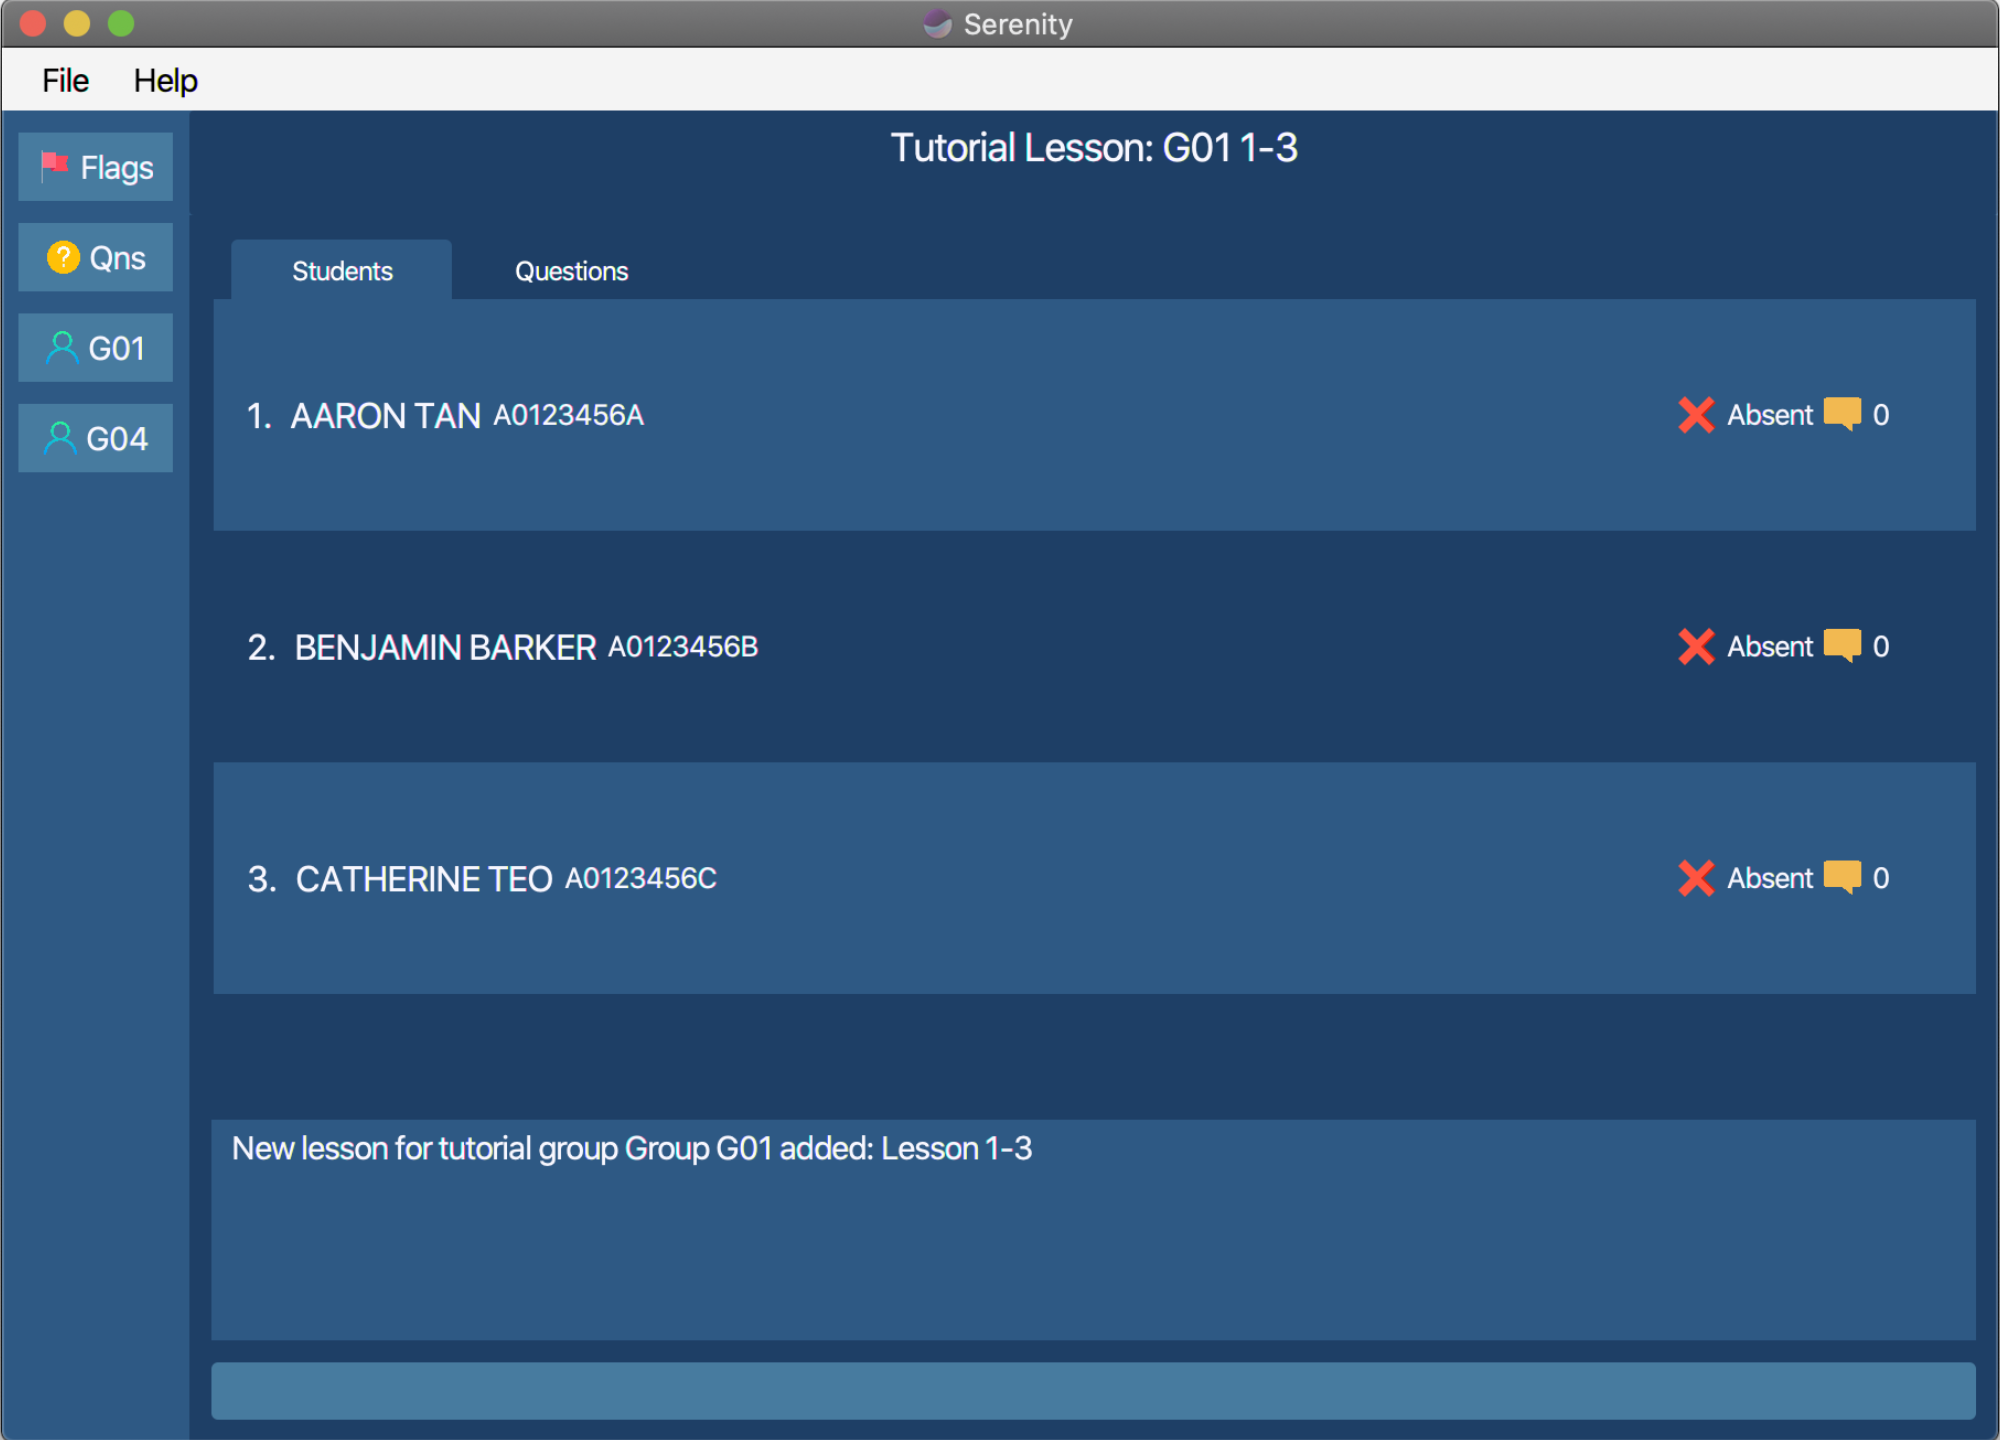 Figure 4.1.3.1 Screen displayed when the
 addlsn command is successfully executed.
4.1.4. Delete an existing tutorial lesson: dellsn
(Contributed by Ryan)
You can use this command to delete an existing lesson from a specified tutorial group.
Format:
dellsn grp/GROUP_NAME lsn/LESSON_NAME
Example:
You accidentally added the wrong tutorial lesson 1-1 for tutorial group G01 and you decided to remove it.
Deleting an existing lesson from a tutorial group:
- Type
dellsn grp/G01 lsn/1-1into the Command Box. - Press
Enterto execute.
Outcome:
- The Result Display will show a success message.
-
Serenity will exit tutorial lesson
1-1page and enter tutorial groupG01page. - You can now see that tutorial lesson
1-1no longer exists.
4.1.5. Add a new student: addstudent
(Contributed by Chun Yong)
You can use this command to add a new student to a tutorial group.
Format:
addstudent grp/GROUP_NAME name/STUDENT_NAME matric/STUDENT_NUMBER
Example:
A new student named David Chong with student number A0123456D entered your tutorial group,
and you want to add him to tutorial group G01.
Adding a new student to a tutorial group:
- Type
addstudent grp/G01 name/David Chong matric/A0123456Dinto the Command Box. - Press
Enterto execute.
Outcome:
- The Result Display will show a success message.
-
David Chongwill be added to the list of students in tutorial groupG01.
4.1.6. Delete an existing student: delstudent
(Contributed by Chun Yong)
You can use this command to delete an existing student from a tutorial group.
Format:
delstudent grp/GROUP_NAME name/STUDENT_NAME matric/STUDENT_NUMBER
delstudent INDEX grp/GROUP_NAME
Example:
A student named Aaron Tan with student number A0123456A dropped the CS2101 module,
and you need to remove him from the tutorial group G01. Aaron Tan is the first person on the student list
so his index number is 1.
Method 1
Deleting an existing student from a tutorial group by name and student number:
- Type
delstudent grp/G01 name/Aaron Tan matric/A0123456Ainto the Command Box. - Press
Enterto execute.
Method 2
Deleting an existing student from a tutorial group by index number:
- Type
delstudent 1 grp/G01into the Command Box. - Press
Enterto execute.
Outcome:
- The Result Display will show a success message.
-
Aaron Tanwill no longer be in the list of students in tutorial groupG01.
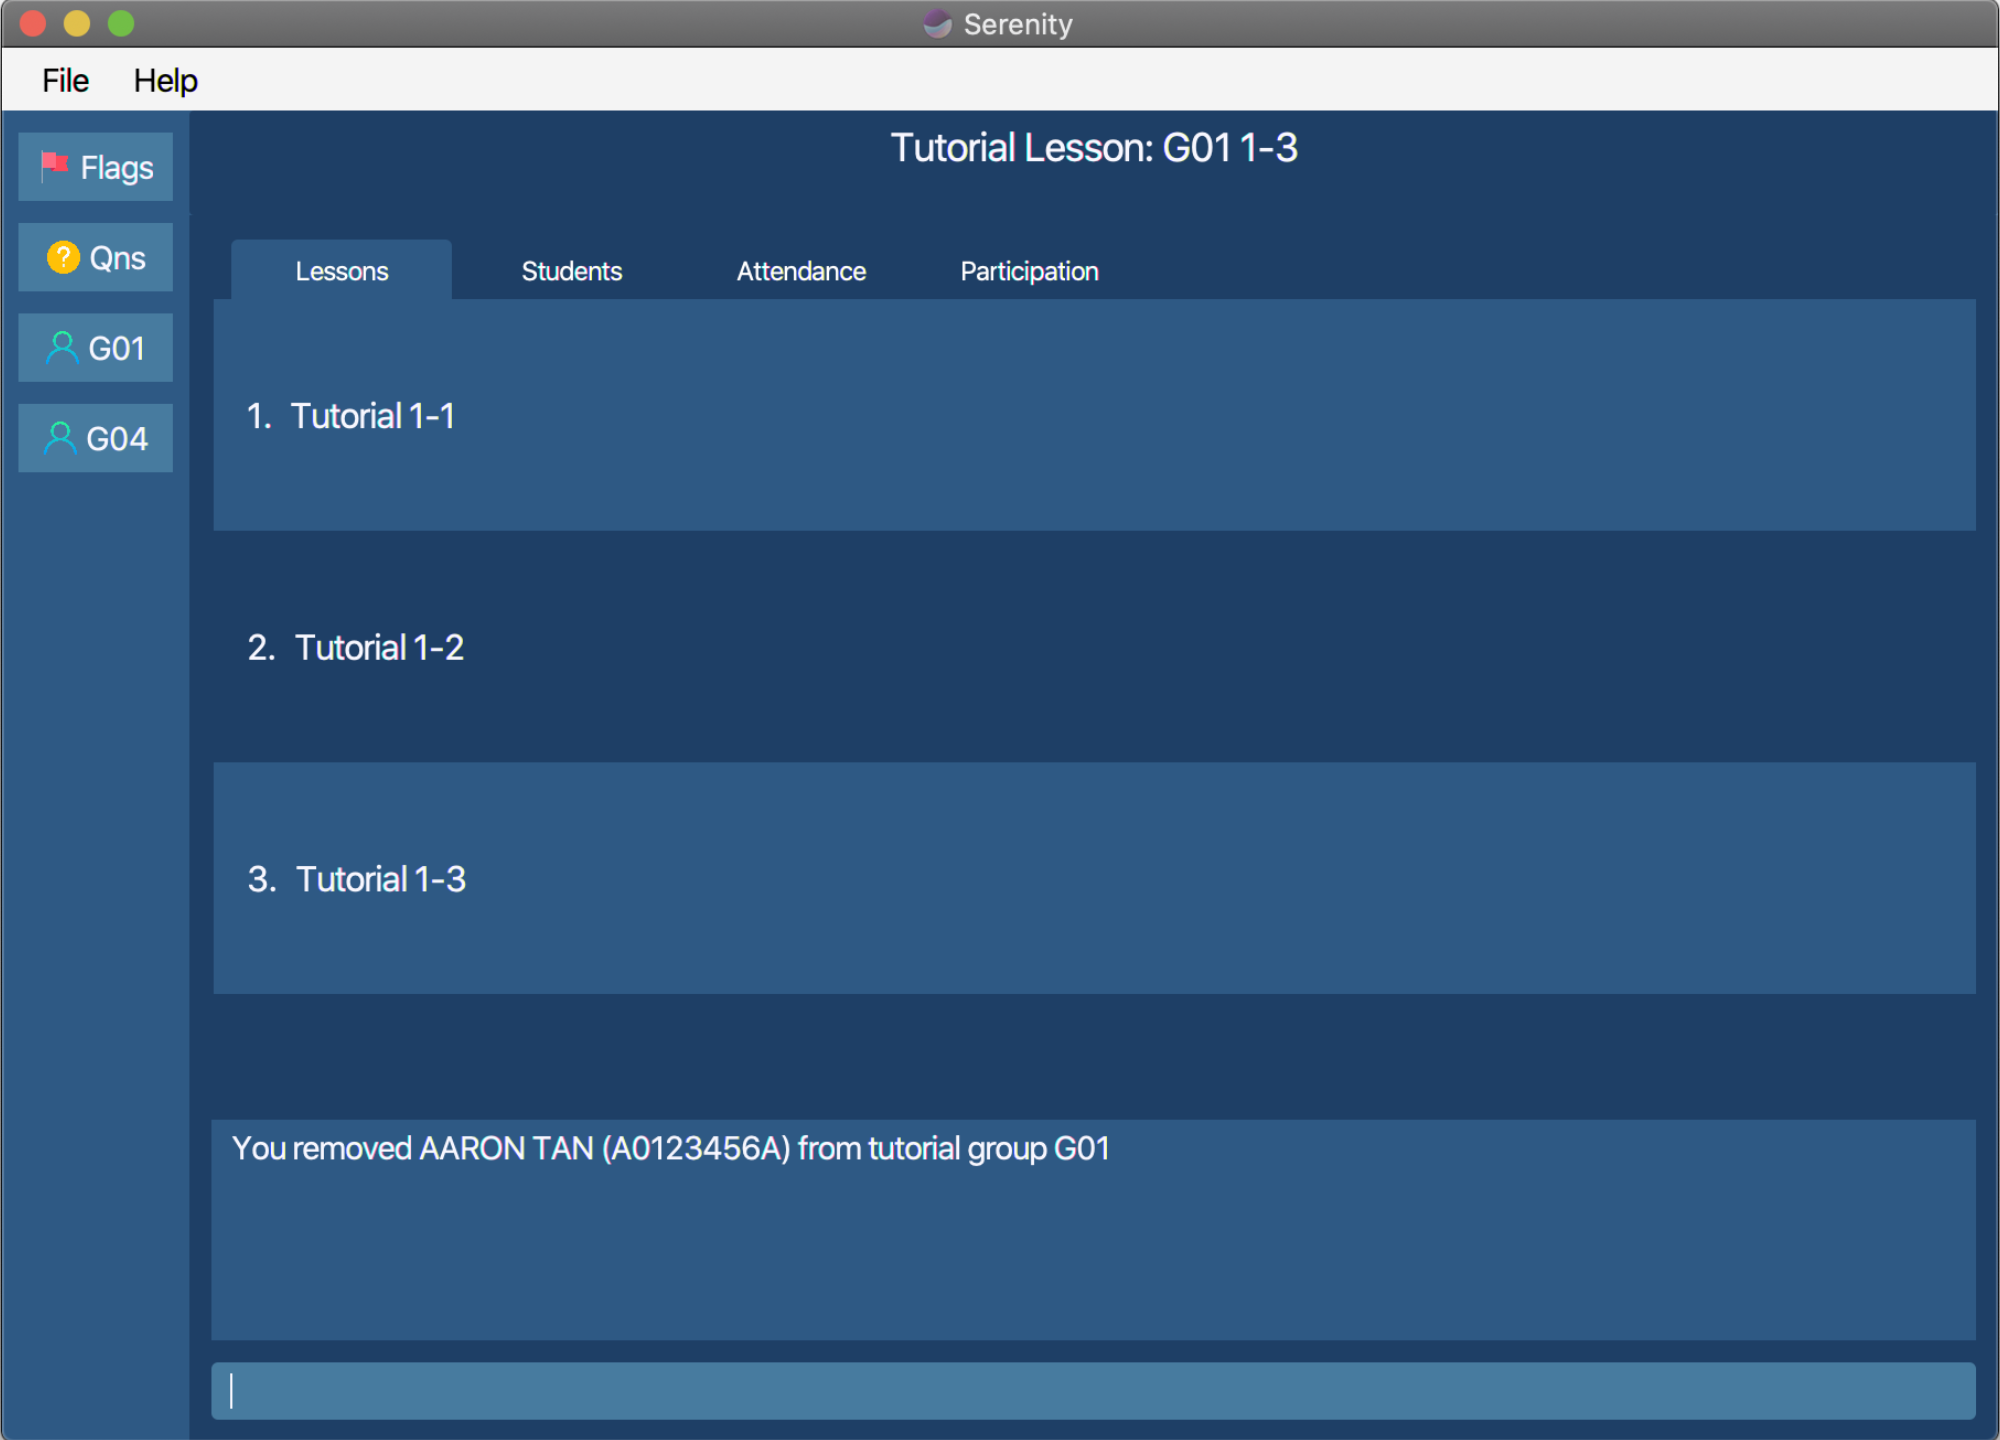 Figure 4.1.6.1 Screen displayed when the
 delstudent command is successfully executed.
4.2. Attendance taking
(Contributed by Xin Yee)
Need to mark attendance of your students at the start of each lesson quickly? This feature allows you to mark attendance of students easily.
4.2.1. Mark all students as present: markpresent all
You can use this command to mark all students in a tutorial group as present for a tutorial lesson.
![]() Tip for the
Tip for the markpresent all command:
You can conveniently mark all students as present at once in the beginning of the tutorial lesson, then mark some students as absent afterwards. You can then start your tutorial lesson without much hassle.
Format:
markpresent all
![]() Warning:
You must navigate to the tutorial lesson page through
Warning:
You must navigate to the tutorial lesson page through viewlsn before this command can be used.
Example:
All students in group G01 are present for your tutorial lesson 1-2 of tutorial group G01.
Marking all students in a tutorial group as present for a tutorial lesson:
To mark all of them present at once:
- Navigate to view group
G01lesson1-2viaviewlsncommand. - Type
markpresent allinto the Command Box. - Press
Enterto execute.
Outcome:
- The Result Display will show a success message.
- You can now see that all the students’ attendance have been updated on the Student Information Panel.
4.2.2. Mark a student as present: markpresent
You can use this command to mark a specific student as present for a tutorial lesson.
Format:
markpresent name/STUDENT_NAME matric/STUDENT_NUMBER
markpresent INDEX
![]() Warning: You must navigate to the tutorial lesson page through
Warning: You must navigate to the tutorial lesson page through viewlsn before this command can be used.
Example:
A student named Aaron Tan with student number A0123456A is present for your tutorial lesson 1-2 of tutorial group G01.
1-2 of tutorial group G01. Aaron Tan is the first person on the student list so his index number is 1.
Method 1
Marking a student as present for a tutorial lesson by name and student number:
To mark him present:
- Navigate to view group
G01lesson1-2viaviewlsncommand. - Type
markpresent name/Aaron Tan matric/A0123456Ainto the Command Box. - Press
Enterto execute.
Method 2
Marking a student as present for a tutorial lesson by index number:
To mark him present:
- Navigate to view group
G01lesson1-2viaviewlsncommand. - Type
markpresent 1into the Command Box. - Press
Enterto execute.
Outcome:
- The Result Display will show a success message.
- You can now see that his attendance has been updated on the Student Information Panel.
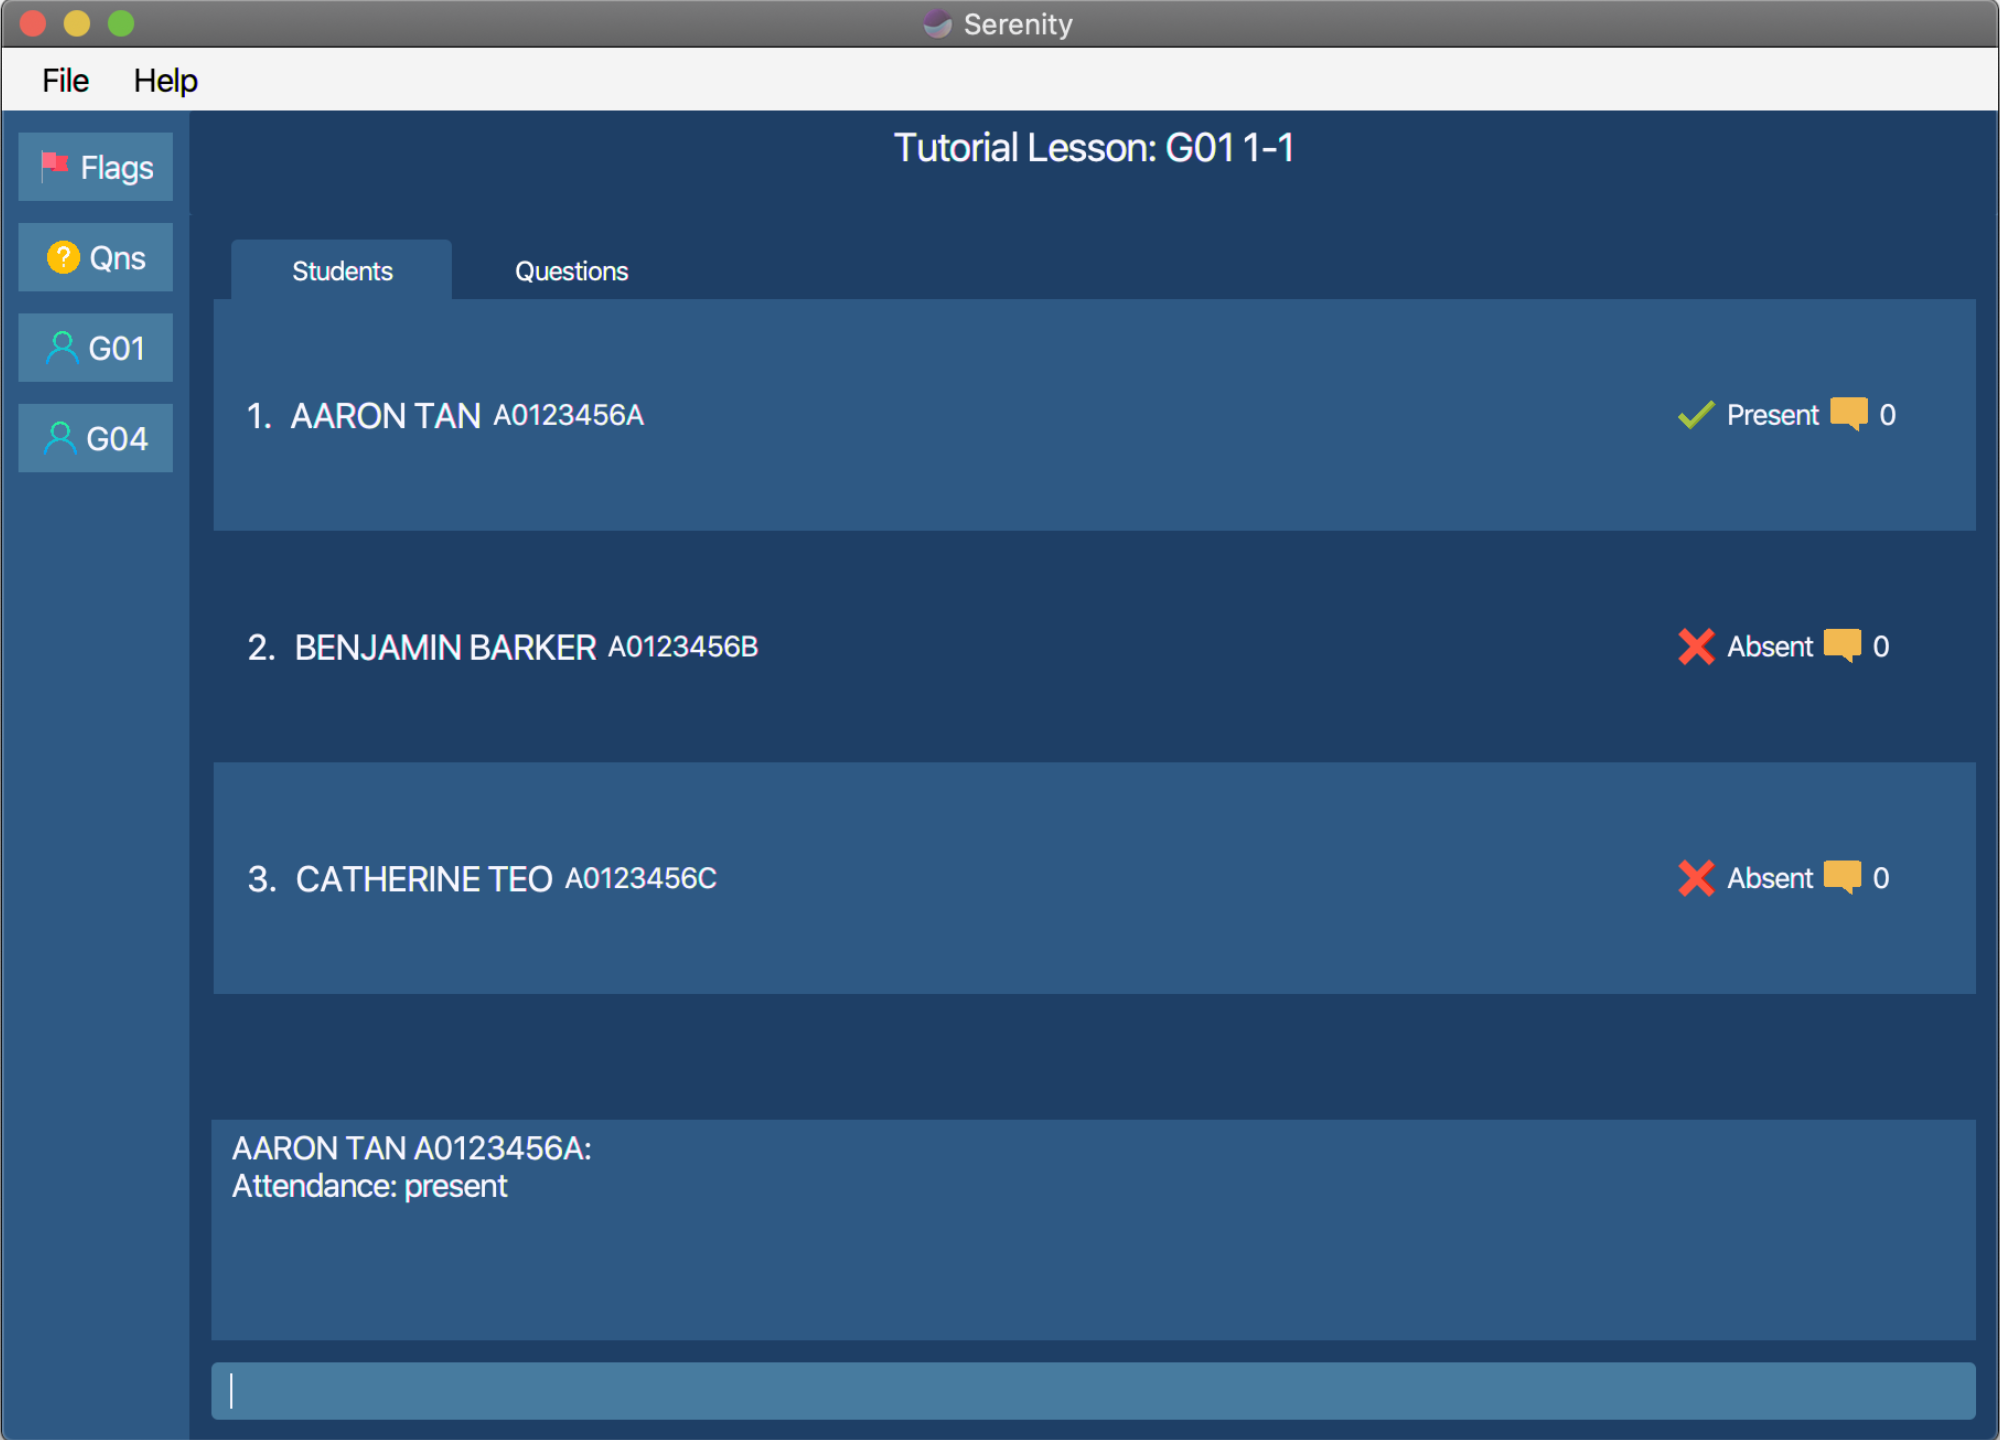 Figure 4.2.2.1 Screen displayed when the command is successfully executed.
4.2.3. Mark a student as absent: markabsent
You can use this command to mark a specific student as absent for a tutorial lesson.
Format:
markabsent name/STUDENT_NAME matric/STUDENT_NUMBER
markabsent INDEX
![]() Warning: You must navigate to the tutorial lesson page through
Warning: You must navigate to the tutorial lesson page through viewlsn before this command can be used.
Example:
A student named Aaron Tan with student number A0123456A is absent for your tutorial lesson 1-2 of tutorial group G01.
Aaron Tan is the first person on the student list so his index number is 1.
Method 1
Marking a student as absent for a tutorial lesson by name and student number:
- Navigate to view group
G01lesson1-2viaviewlsncommand. - Type
markabsent name/Aaron Tan matric/A0123456Ainto the Command Box. - Press
Enterto execute.
Method 2
Marking a student as absent for a tutorial lesson by index number:
- Navigate to view group
G01lesson1-2viaviewlsncommand. - Type
markabsent 1into the Command Box. - Press
Enterto execute.
Outcome:
- The Result Display will show a success message.
- You can now see that his attendance has been updated on the Student Information Panel.
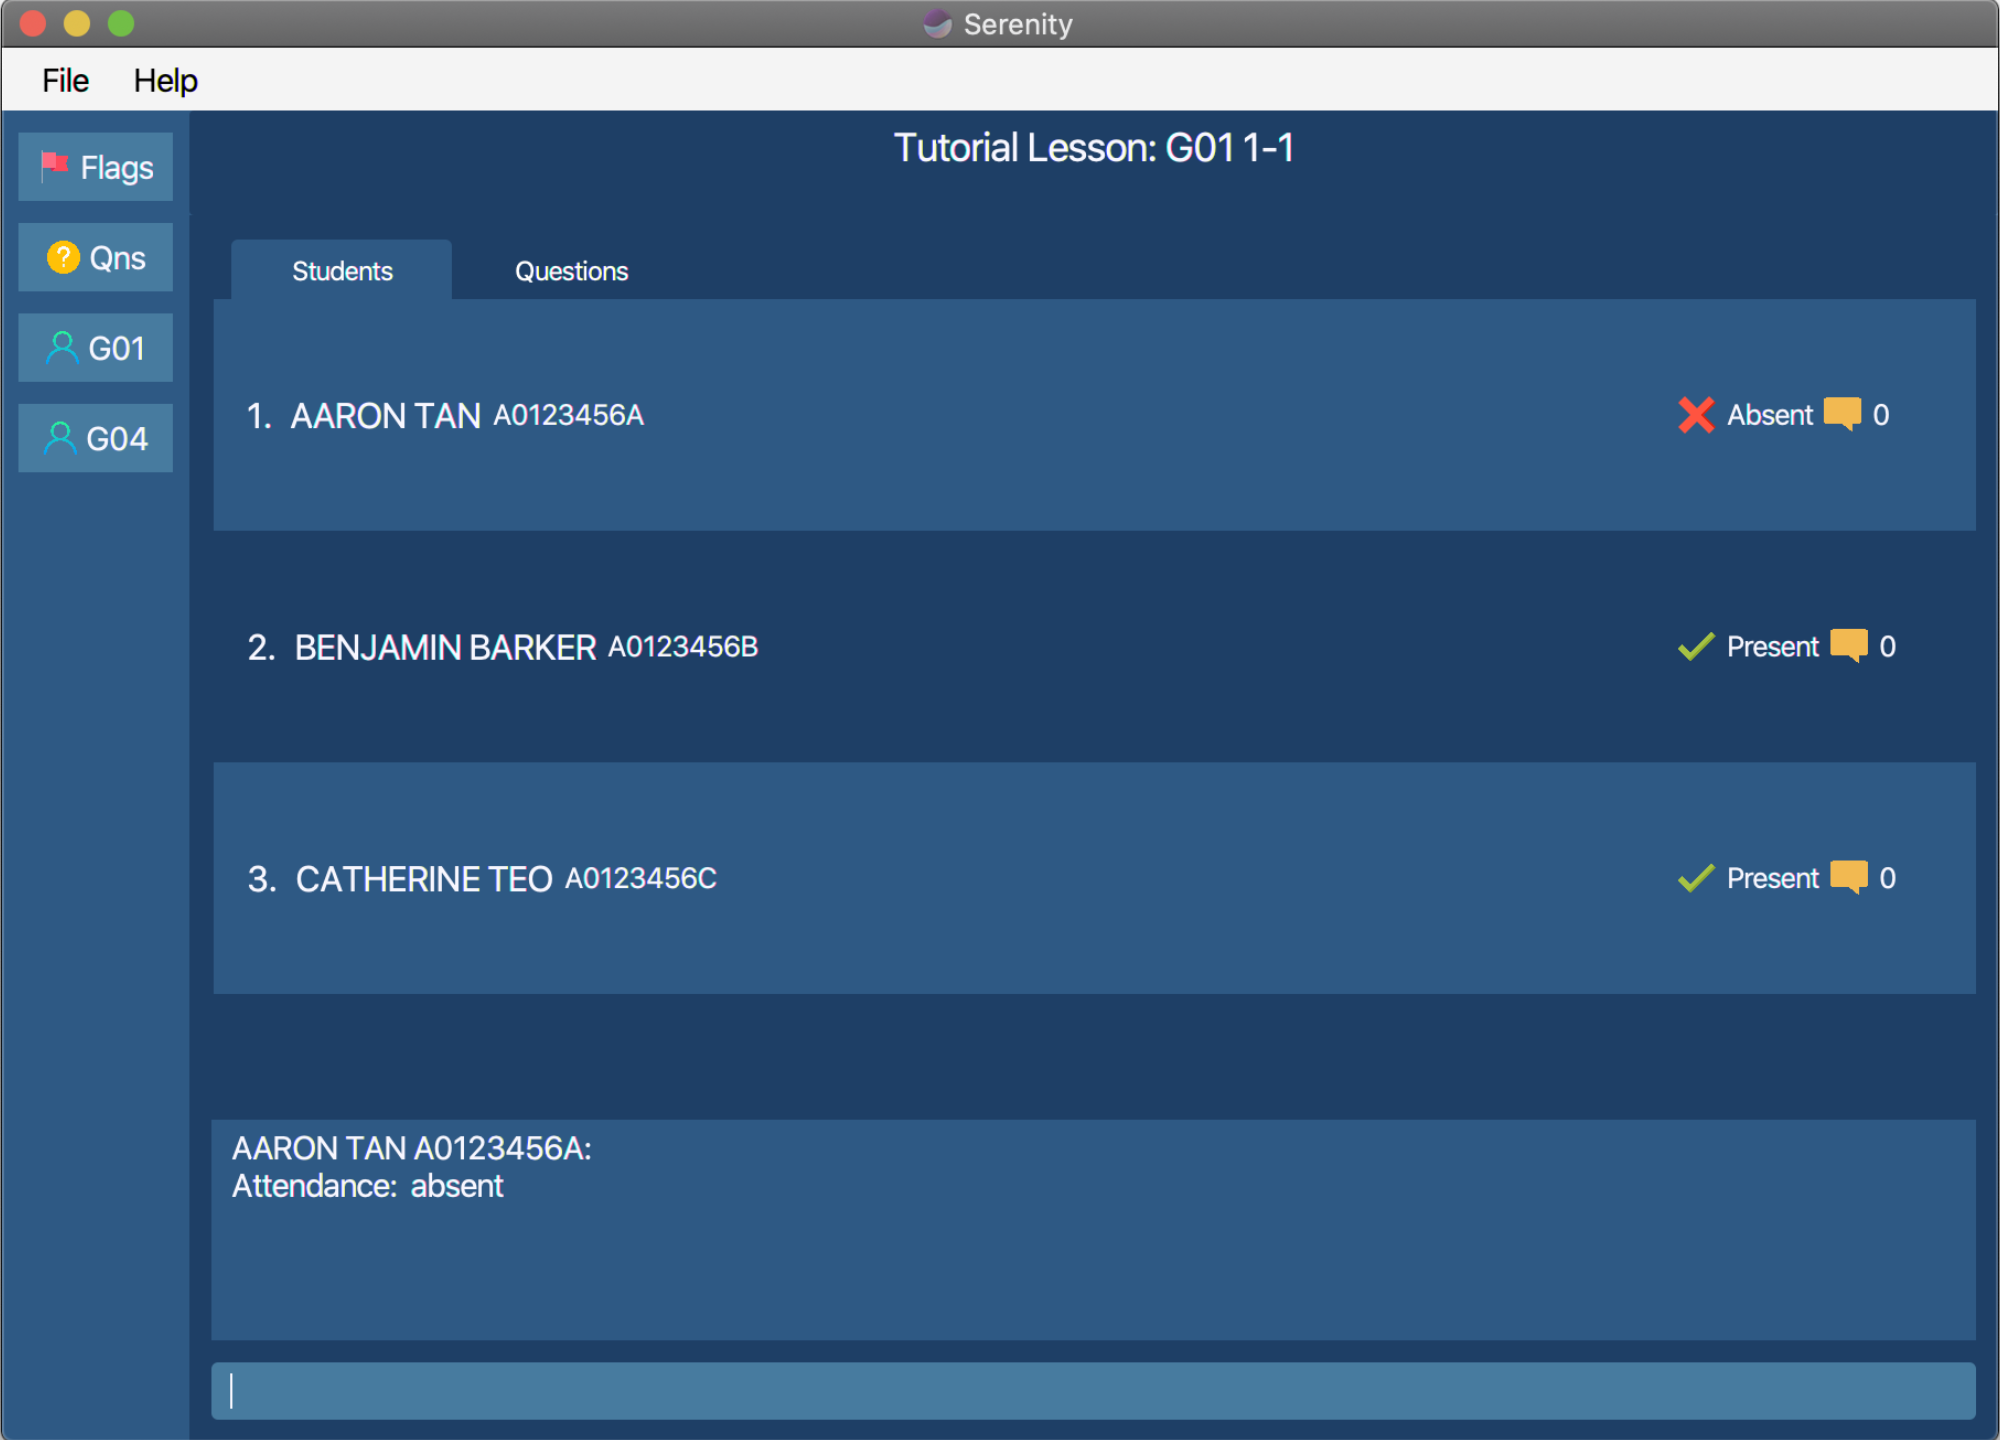 Figure 4.2.3.1 Screen displayed when the command is successfully executed.
4.2.4. Mark all students as absent: markabsent all
Accidentally marked all the students as present and want to make them back absent? You can use this command to mark all students in a tutorial group back as absent for a tutorial lesson.
Format:
markabsent all
![]() Warning: You must navigate to the tutorial lesson page through
Warning: You must navigate to the tutorial lesson page through viewlsn before this command can be used.
Example:
All students in group G01 are absent for your tutorial lesson 1-2.
Marking all students in a tutorial group as absent for a tutorial lesson:
- Navigate to view group
G01lesson1-2viaviewlsncommand. - Type
markabsent allinto the Command Box. - Press
Enterto execute.
Outcome:
- The Result Display will show a success message.
- You can now see that all the students’ attendance have been updated on the Student Information Panel.
4.2.5. Flag attendance of a student: flagatt
You can use this command to flag attendance of a specific student so you can remember to check the student’s attendance at the end of class.
Format:
flagatt name/STUDENT_NAME matric/STUDENT_NUMBER
flagatt INDEX
![]() Warning: You must navigate to the tutorial lesson page through
Warning: You must navigate to the tutorial lesson page through viewlsn before this command can be used.
Example:
A student named Aaron Tan with student number A0123456A from your tutorial group G01 decided to join
another group for tutorial lesson 1-2. You want to flag his attendance so that you can remember to check with the
other tutor later on. Aaron Tan is the first person on the student list so his index number is 1.
Method 1
Flagging a student’s attendance for a tutorial lesson by his name and student number:
- Navigate to view group
G01lesson1-2viaviewlsncommand. - Type
flagatt name/Aaron Tan matric/A0123456Ainto the Command Box. - Press
Enterto execute.
Method 2
Flagging a student’s attendance for a tutorial lesson by his index number:
- Navigate to view group
G01lesson1-2viaviewlsncommand. - Type
flagatt 1into the Command Box. - Press
Enterto execute.
Outcome:
- The Result Display will show a success message.
- His attendance will now be flagged for future follow-up actions.
4.2.6. Unflag attendance of a student: unflagatt
You can use this command to unflag attendance of a specific student that was flagged after you have checked whether the
student attended a replacement class. If you accidentally flagged the wrong student, the action can also be easily undone
using unflagatt command.
Format:
unflagatt name/STUDENT_NAME matric/STUDENT_NUMBER
unflagatt INDEX
![]() Warning: You must navigate to the tutorial lesson page through
Warning: You must navigate to the tutorial lesson page through viewlsn before this command can be used.
Example:
A student named Aaron Tan with student number A0123456A from your tutorial group G01 decided to go for
another tutorial class for lesson 1-2. You previously flagged his attendance and you now want to unflag it
after checking that he has attended the replacement class. Aaron Tan is the first person on the student list
so his index number is 1.
Method 1
Unflagging a student’s attendance for a tutorial lesson by his name and student number:
- Navigate to view group
G01lesson1-2viaviewlsncommand. - Type
unflagatt name/Aaron Tan matric/A0123456Ainto the Command Box. - Press
Enterto execute.
Method 2
Unflagging a student’s attendance for a tutorial lesson by his index number:
- Navigate to view group
G01lesson1-2viaviewlsncommand. - Type
unflagatt 1into the Command Box. - Press
Enterto execute.
Outcome:
- The Result Display will show a success message.
- His attendance will now be unflagged.
4.2.7. Export attendance as XLSX file: exportatt
(Contributed by Rui En)
You can use this command to export the attendance sheet of a specific tutorial group as a new Excel file.
![]() Tip for the
Tip for the exportatt command:
You can conveniently obtain the soft copy version of the attendance sheet for attendance list submission as part of NUS Centre for English Language Communication requirements.
![]() Notes regarding the
Notes regarding the exportatt command:
The attendance sheet will be saved as a XLSX file named after the tutorial group. The file will be saved at the same folder as your Serenity application.
Format:
exportatt grp/GROUP_NAME
Example:
You want to export the attendance sheet of tutorial group G01.
Exporting attendance sheet of a tutorial group:
- Type
exportatt grp/G01into the Command Box. - Press
Enterto execute.
Outcome:
- The Result Display will show a success message.
- The attendance sheet of tutorial group
G01will be saved asG01_attendance.xlsx. You can find the XLSX file at the location where your Serenity application is located.

Figure 4.2.7.1 Command for exportatt command.
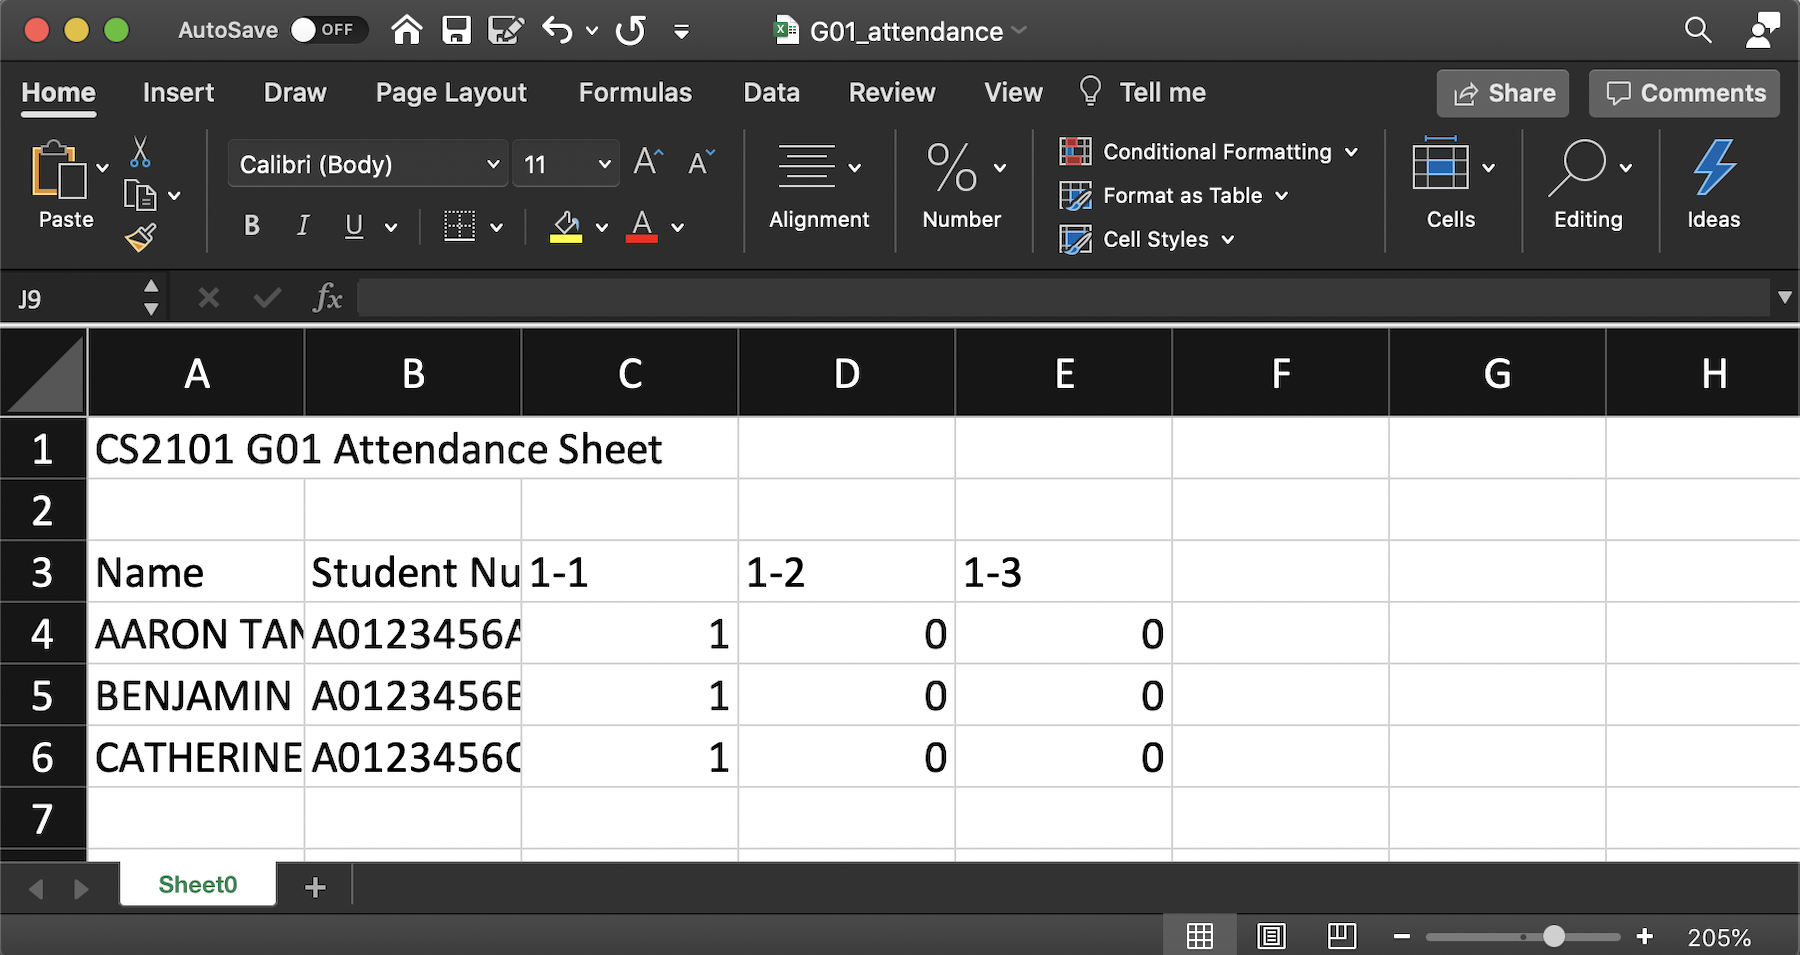
Figure 4.2.7.2 Contents of excel file generated.
4.3. Participation marking
(Contributed by Xin Yee)
Need to keep track of all your students’ participation during lessons quickly? This feature allows you to key in a student’s participation score easily with a scale for reference.
Participation score scale from 1 to 5:
| Score | 1 | 2 | 3 | 4 | 5 |
|---|---|---|---|---|---|
| Remarks | Very Poor | Poor | Sufficient | Good | Commendable |
4.3.1. Add participation score of a student: addscore
You can use this command to increase the participation score of a specific student for a tutorial lesson.
![]() Warning regarding the
Warning regarding the addscore command:
You cannot increase the participation score of a student such that the final score is more than 5. The maximum score is 5.
Format:
addscore name/STUDENT_NAME matric/STUDENT_NUMBER score/SCORE_TO_ADD
addscore INDEX score/SCORE_TO_ADD
![]() Warning: You must navigate to the tutorial lesson page through
Warning: You must navigate to the tutorial lesson page through viewlsn before this command can be used.
Example:
In tutorial lesson 1-2 of tutorial group G01,
you felt that your student named Aaron Tan with student number A0123456A provided some good insights during the lesson.
You decided to add 1 mark to his participation score for this tutorial lesson. Aaron Tan
is the first person on the student list so his index number is 1.
Method 1
Adding participation score of a student in a tutorial lesson by name and student number:
- Navigate to view tutorial lesson
1-2of tutorial groupG01viaviewlsncommand. - Type
addscore name/Aaron Tan matric/A0123456A score/1into the Command Box. - Press
Enterto execute.
Method 2
Adding participation score of a student in a tutorial lesson by indexnumber:
- Navigate to view tutorial lesson
1-2of tutorial groupG01viaviewlsncommand. - Type
addscore 1 score/1into the Command Box. - Press
Enterto execute.
Outcome:
- The Result Display will show a success message.
- You can now see that his score has been updated on the Student Information Panel.
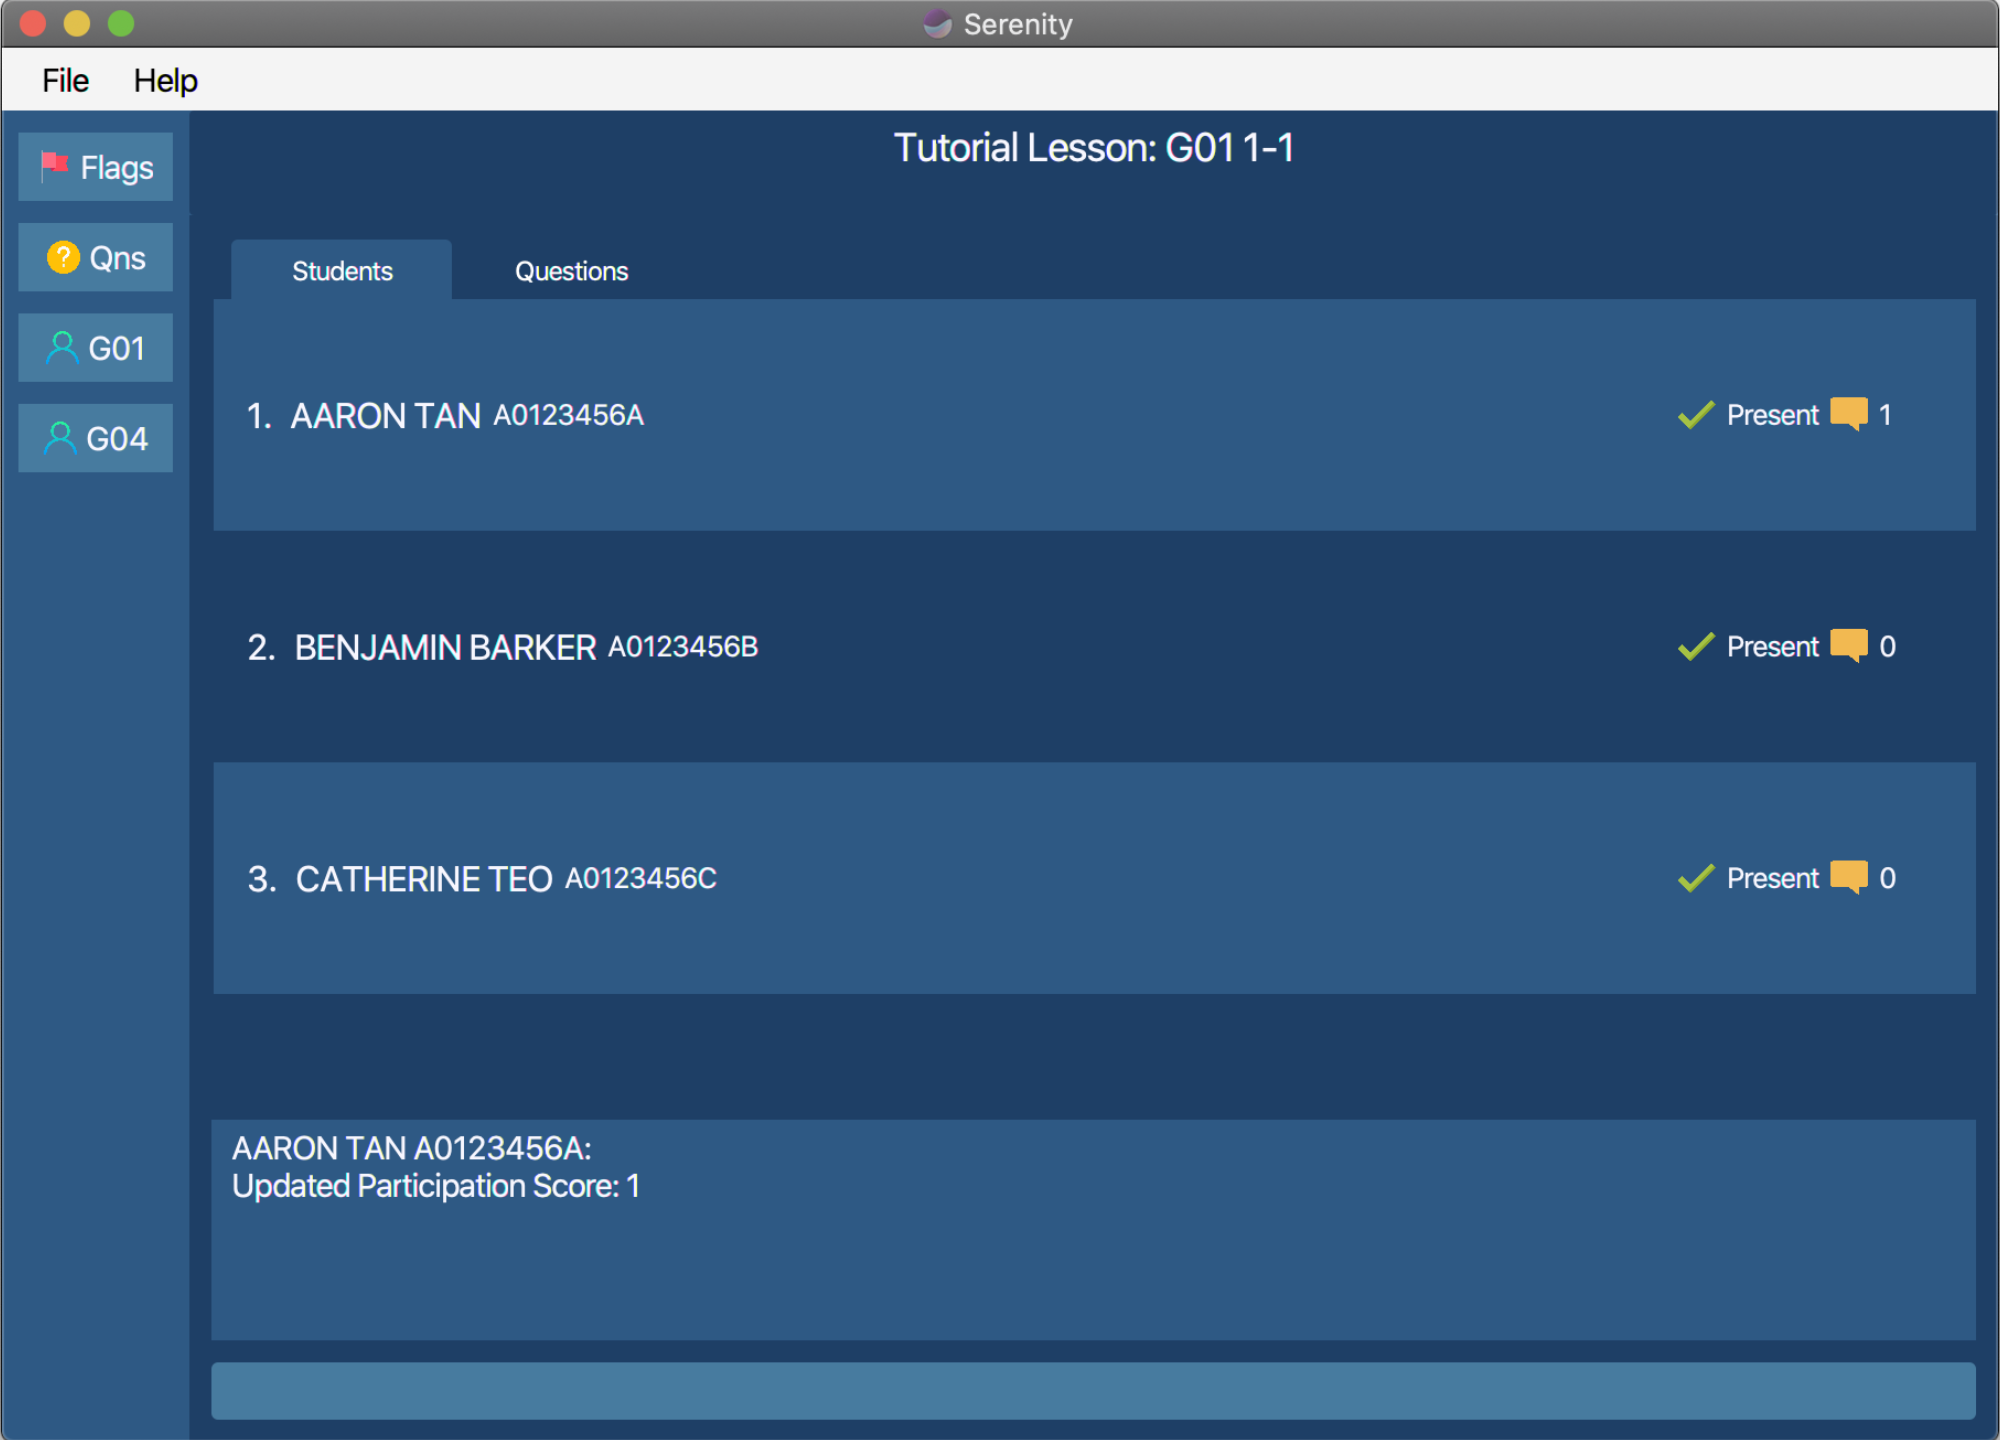
Figure 4.3.1.1 Screen displayed when the command is successfully executed.
4.3.2. Subtract participation score of a student: subscore
You can use this command to decrease the participation score of a specific student for a tutorial lesson.
![]() Warning regarding the
Warning regarding the subscore command:
You cannot decrease the participation score of a student such that the final score is less than 0. The minimum score is 0.
Format:
subscore name/STUDENT_NAME matric/STUDENT_NUMBER score/SCORE
subscore INDEX score/SCORE
![]() Warning: You must navigate to the tutorial lesson page through
Warning: You must navigate to the tutorial lesson page through viewlsn before this command can be used.
Example:
In tutorial lesson 1-2 of tutorial group G01,
you felt that your student named Aaron Tan with student number A0123456A responses were actually not very insightful
on second thoughts. You decided to subtract 1 mark from his participation score for this tutorial lesson. Aaron Tan
is the first person on the student list so his index number is 1.
Method 1
Subtracting participation score of a student in a tutorial lesson by name and student number:
- Navigate to view tutorial lesson
1-2of tutorial groupG01viaviewlsncommand. - Type
subscore name/Aaron Tan matric/A0123456A score/1into the Command Box. - Press
Enterto execute.
Method 2
Subtracting participation score of a student in a tutorial lesson:
- Navigate to view tutorial lesson
1-2of tutorial groupG01viaviewlsncommand. - Type
subscore 1 score/1into the Command Box. - Press
Enterto execute.
Outcome:
- The Result Display will show a success message.
- You can now see that his score has been updated on the Student Information Panel.
4.3.3. Edit participation score for a student: editscore
You can use this command to edit participation score of a specific student in a tutorial lesson.
Format:
editscore name/STUDENT_NAME matric/STUDENT_NUMBER score/SCORE
editscore INDEX score/SCORE
![]() Warning: You must navigate to the tutorial lesson page through
Warning: You must navigate to the tutorial lesson page through viewlsn before this command can be used.
Example:
In tutorial lesson 1-2 of tutorial group G01,
you noticed that your student named Aaron Tan with student number A0123456A participated actively in class
discussions for the lesson. You decided to edit his current score to 3 marks for this lesson.
Aaron Tan is the first person on the student list so his index number is 1.
Method 1
Edit participation score of a student in a tutorial lesson by name and student number:
- Navigate to view group
G01lesson1-2viaviewlsncommand. - Type
editscore name/Aaron Tan matric/A0123456A score/3into the Command Box. - Press
Enterto execute.
Method 2
Edit participation score of a student in a tutorial lesson by index number:
- Navigate to view group
G01lesson1-2viaviewlsncommand. - Type
editscore 1 score/3into the Command Box. - Press
Enterto execute.
Outcome:
- The Result Display will show a success message.
- You can now see that his score has been updated on the Student Information Panel.
4.3.4. Export participation scores as XLSX file: exportscore
(Contributed by Rui En)
You can use this command to export the participation score sheet of a specific tutorial group as a new Excel file.
![]() Notes regarding the
Notes regarding the exportscore command:
The participation score sheet will be saved as a XLSX file named after the tutorial group. The file will be saved at the same folder as your Serenity application.
Format:
exportscore grp/GROUP_NAME
Example:
You want to collate the participation scores of tutorial group GO1 into a XLSX file for grading on a
different platform (i.e. LumiNUS).
Exporting participation score sheet of a tutorial group:
- Type
exportscore grp/G01into the Command Box. - Press
Enterto execute.
Outcome:
- The Result Display will show a success message.
- The participation score sheet of tutorial group
G01will be saved asG01_participation.xlsx. You can find the XLSX file at the location where your Serenity application is located.
4.4. Question addressing
(Contributed by Wen Jin)
Need to keep track of all your students’ questions during lessons quickly? This feature allows you to key in questions easily for future reference.
4.4.1. Add a new question: addqn
You can use this command to add a question that was asked in a tutorial lesson, so that you can address the question in the future.
Format:
addqn qn/QUESTION
![]() Warning: You must navigate to the tutorial lesson page through
Warning: You must navigate to the tutorial lesson page through viewlsn before this command can be used.
Example:
A student asked you, “What is the deadline for the report?” during the lesson 1-1 in group G01.
As the deadline of the report has changed, you want to note this question down, check the new deadline and
address the question in the future.
Adding a question:
- Navigate to view group
G01lesson1-1viaviewlsncommand. - Type
addqn qn/What is the deadline for the report?into the Command Box. - Press
Enterto execute.
Outcome:
- The Result Display will show a success message.
- The question will be added to the list of questions.
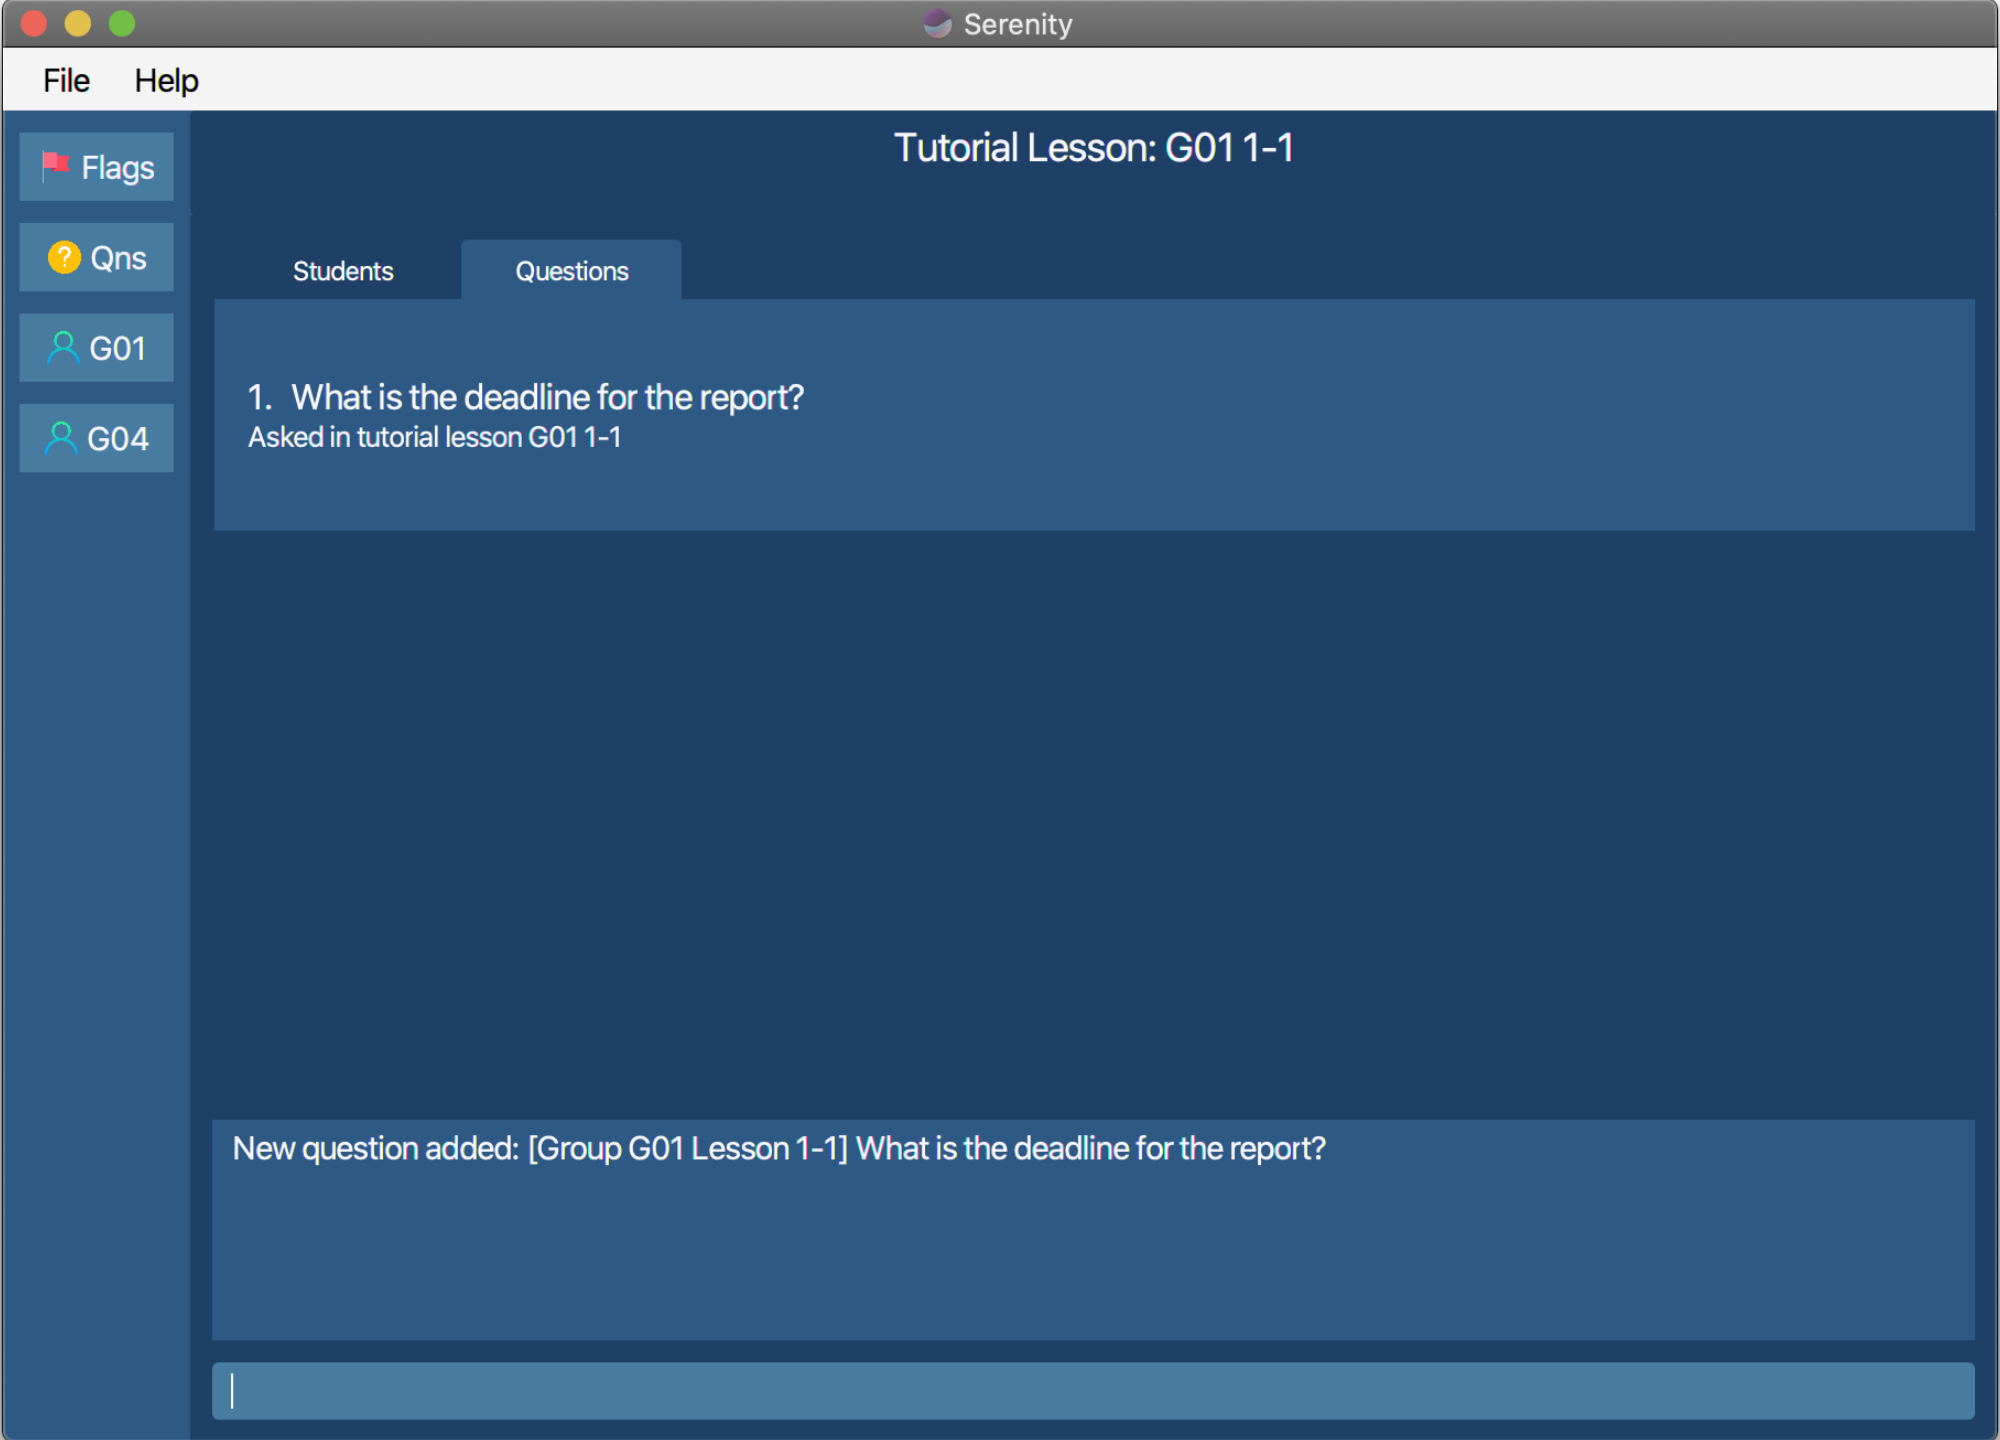
Figure 4.4.1.1 List of questions after the command is successfully executed.
4.4.2. Delete an existing question: delqn
You can use this command to delete a question after addressing it.
Format:
delqn INDEX
Example:
You addressed one of the questions at the end of a tutorial lesson and you want to delete the question from the list of questions.
Deleting a question:
- Type
delqn 1into the Command Box. - Press
Enterto execute.
Outcome:
- The Result Display will show a success message.
- The question will be deleted from the list of questions.
4.4.3. Edit an existing question: editqn
You can use this command to edit an existing question that was asked in a tutorial lesson.
Format:
editqn INDEX [grp/GROUP_NAME] [lsn/LESSON_NAME] [qn/QUESTION]
![]() Notes regarding the
Notes regarding the editqn command:
- You can edit the question’s description, or the group/lesson the question was asked in.
- The existing values will be updated to the new values.
- If
grp/GROUP_NAMEorlsn/LESSON_NAMEis supplied, ensure that the group or lesson exists. Otherwise, an error message will be displayed to alert you.
Example:
Suppose you have accidentally made a spelling mistake in the First question in the displayed list and
wish to change it from “What is the dedline for the report?” to “What is the deadline for the report?”.
You can do so as follows.
Editing a question:
- Type
editqn 1 qn/What is the deadline for the report?into the Command Box. - Press
Enterto execute.
Outcome:
- The Result Display will show a success message.
- The Data Display will update and display the list of all your questions, including the edited question.
4.4.4. Find questions by keywords: findqn
You can use this command to find a question that was asked in a tutorial lesson. Serenity will help you search for questions that contain the keywords that you are finding.
Format:
findqn KEYWORD [MORE_KEYWORDS]...
Example:
Let say your question list has a bunch of questions from all your tutorial lessons.
You want to search for a specific one with the word deadline in the question. You can do so as follows.
Finding questions:
- Type
findqn deadlineinto the Command Box. - Press
Enterto execute.
Outcome:
- The Result Display will show a success message.
- The Data Display will update and display the list of questions with the keyword
deadline.
4.5 Utility viewing
The following commands allow you to navigate between different views.
4.5.1. View a tutorial group: viewgrp
(Contributed by Ryan)
You can use this command to view the list of students and tutorial lessons of a tutorial group. You will also be able to execute tutorial group-related commands.
![]() Tip for the
Tip for the viewgrp command:
You can easily navigate to the tutorial group by pressing its button in the Side Bar as well! Pressing the tutorial group’s button equals to typing this command.
Format:
viewgrp grp/GROUP_NAME
Example:
You want to view the details of tutorial group G01.
Method 1
Viewing a tutorial group by typing the following command:
- Type
viewgrp grp/G01into the Command Box. - Press
Enterto execute.
Method 2
Viewing a tutorial group by pressing the group button:
- Press the button named
G01in the Side Bar.
Outcome:
- The Result Display will show a success message.
- The Data Display will update and display the information for tutorial group
G01.

Figure 4.5.1.1 User interface for viewing tutorial group.
4.5.2. View a tutorial lesson: viewlsn
(Contributed by Wen Jin)
You can use this command to view and modify the attendance and participation scores of a tutorial lesson. You will also be able to execute tutorial lesson-related commands.
Format:
viewlsn grp/GROUP_NAME lsn/LESSON_NAME
Example:
You want to view the details of tutorial lesson 1-1 of tutorial group G01.
Viewing a tutorial lesson:
- Type
viewlsn grp/G01 lsn/1-1into the Command Box. - Press
Enterto execute.
Outcome:
- The Result Display will show a success message.
- The Data Display will update and display the students’ information for tutorial lesson
1-1of tutorial groupG01.

Figure 4.5.2.1 User interface for viewing tutorial lesson.
4.5.3. View attendance sheet of a tutorial group: viewatt
(Contributed by Rui En)
You can use this command to view the attendance sheet of the students in a tutorial group across all tutorial lessons. The attendance sheet will be displayed in table form.
![]() Notes regarding the
Notes regarding the viewatt command:
- You can view the attendance of all your students in the tutorial group at one glance.
- You can also preview the XLSX file that you can generate with the
exportattcommand, before generating the actual XLSX file.
Format:
viewatt grp/GROUP_NAME
Example:
You want to view the attendance sheet of the students in tutorial group G01.
Viewing the attendance sheet of a tutorial lesson:
- Type
viewatt grp/G01into the Command Box. - Press
Enterto execute.
Outcome:
- The Result Display will show a success message.
- The Data Display will update and display the attendance sheet of tutorial group
G01.
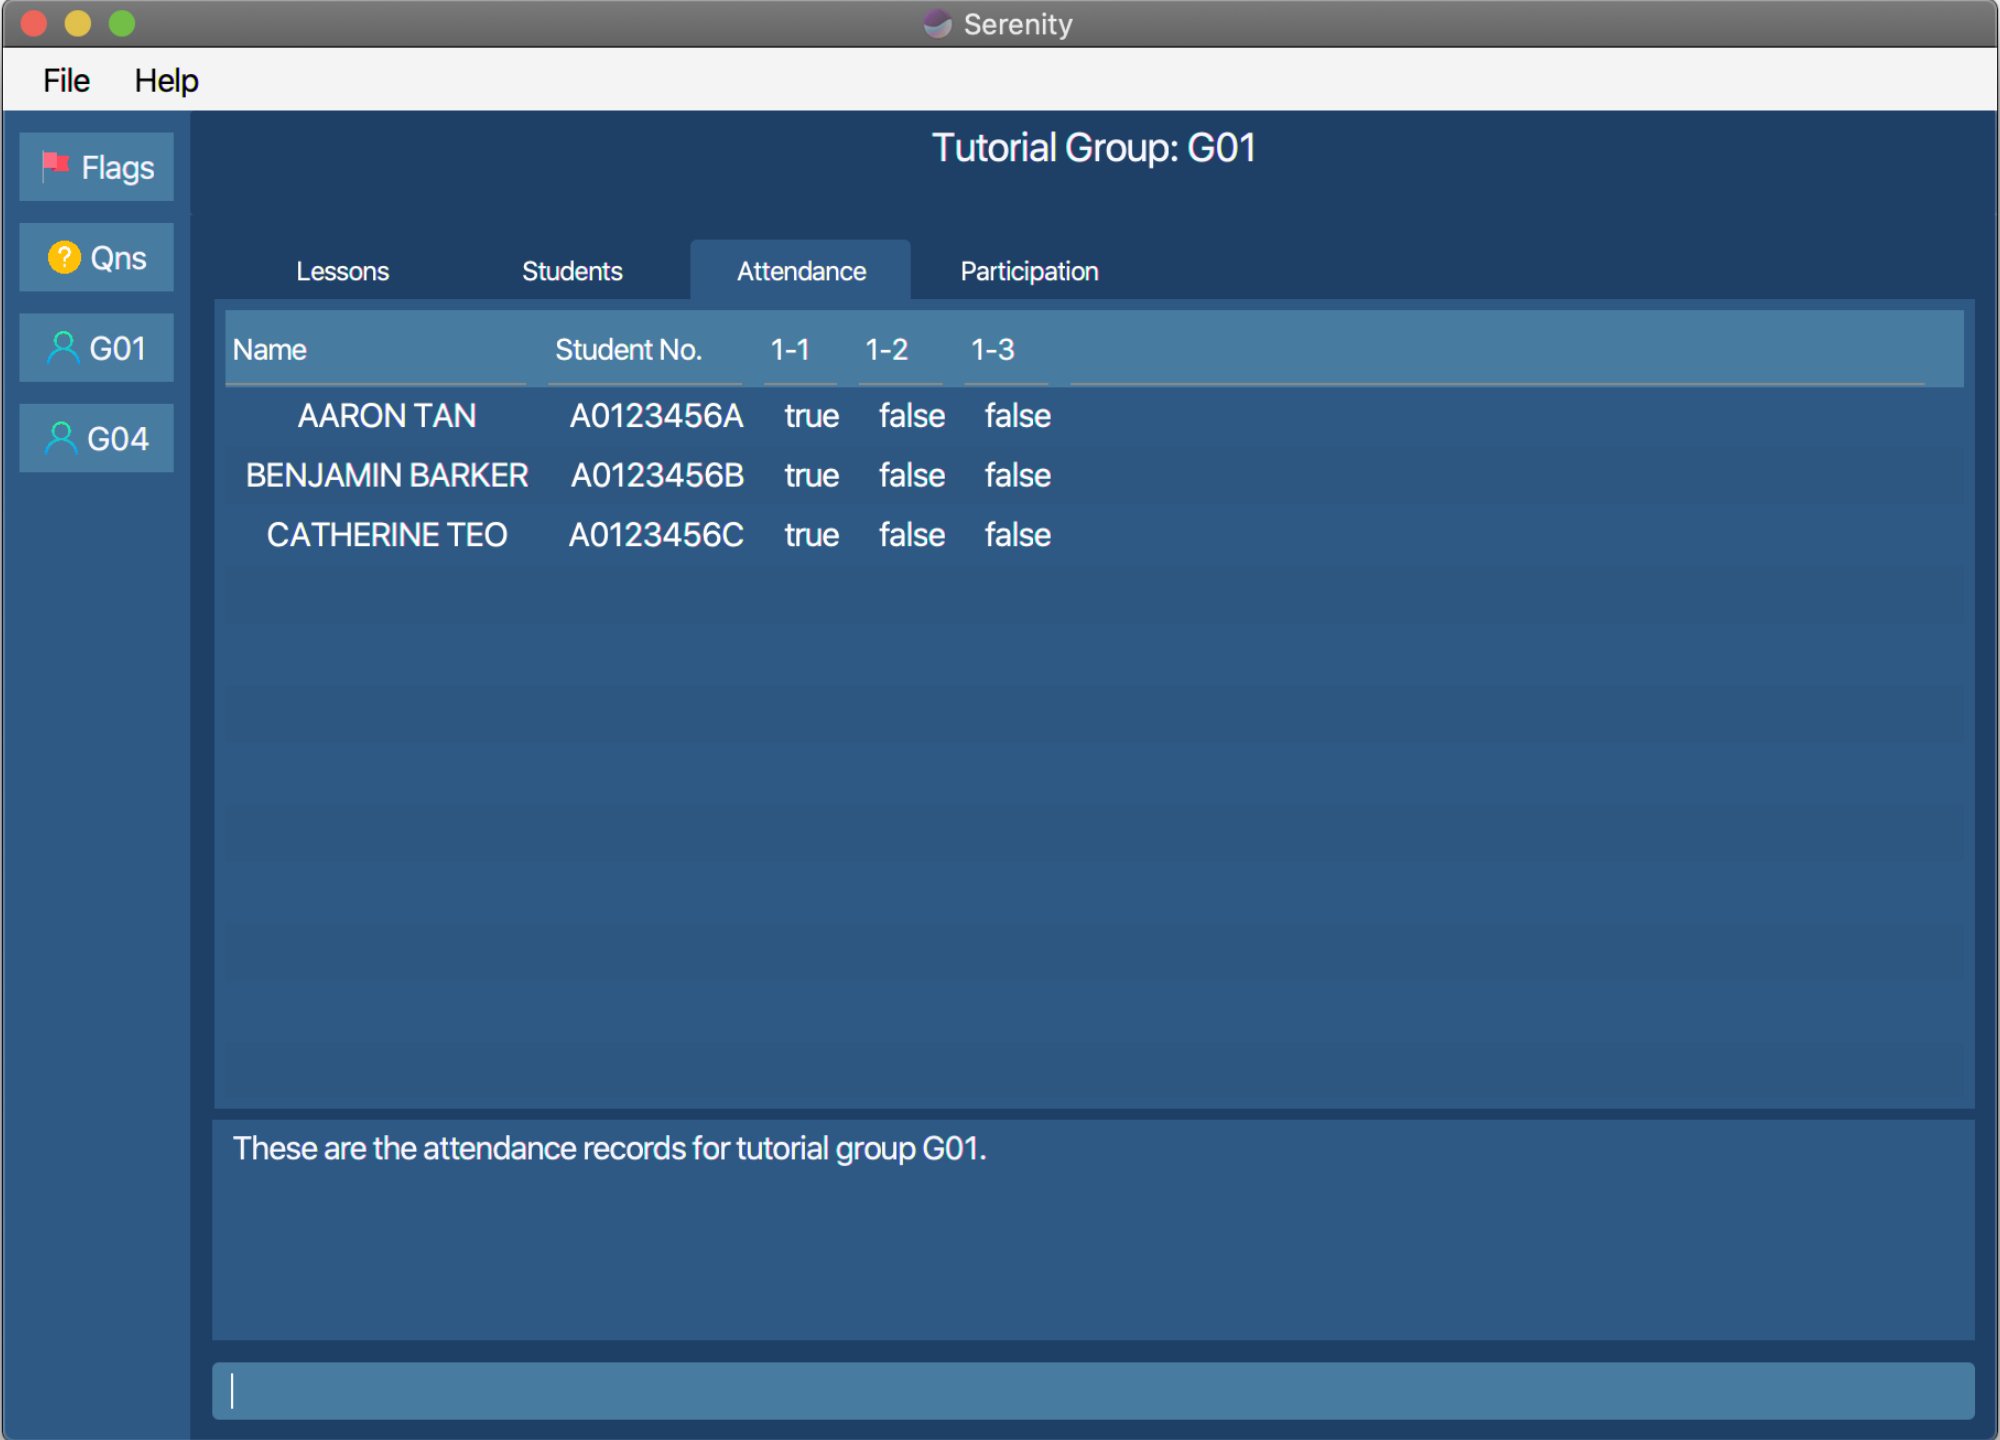
Figure 4.5.3.1 User interface for viewing tutorial attendance.
4.5.4. View participation score sheet of a tutorial group: viewscore
(Contributed by Rui En)
You can use this command to view the participation score sheet of the students in a tutorial group across all tutorial lessons. The participation score sheet will be displayed in table form.
![]() Notes regarding the
Notes regarding the viewscore command:
- You can view the participation score of all your students in the tutorial group at one glance.
- You can also preview the XLSX file that you can generate with the
exportscorecommand, before generating the actual XLSX file.
Format:
viewscore grp/GROUP_NAME
Example:
You want to view the participation score sheet of the students in tutorial group G01.
Viewing the participation score sheet of a tutorial lesson:
- Type
viewscore grp/G01into the Command Box. - Press
Enterto execute.
Outcome:
- The Result Display will show a success message.
- The Data Display will update and display the participation score sheet of tutorial group
G01.
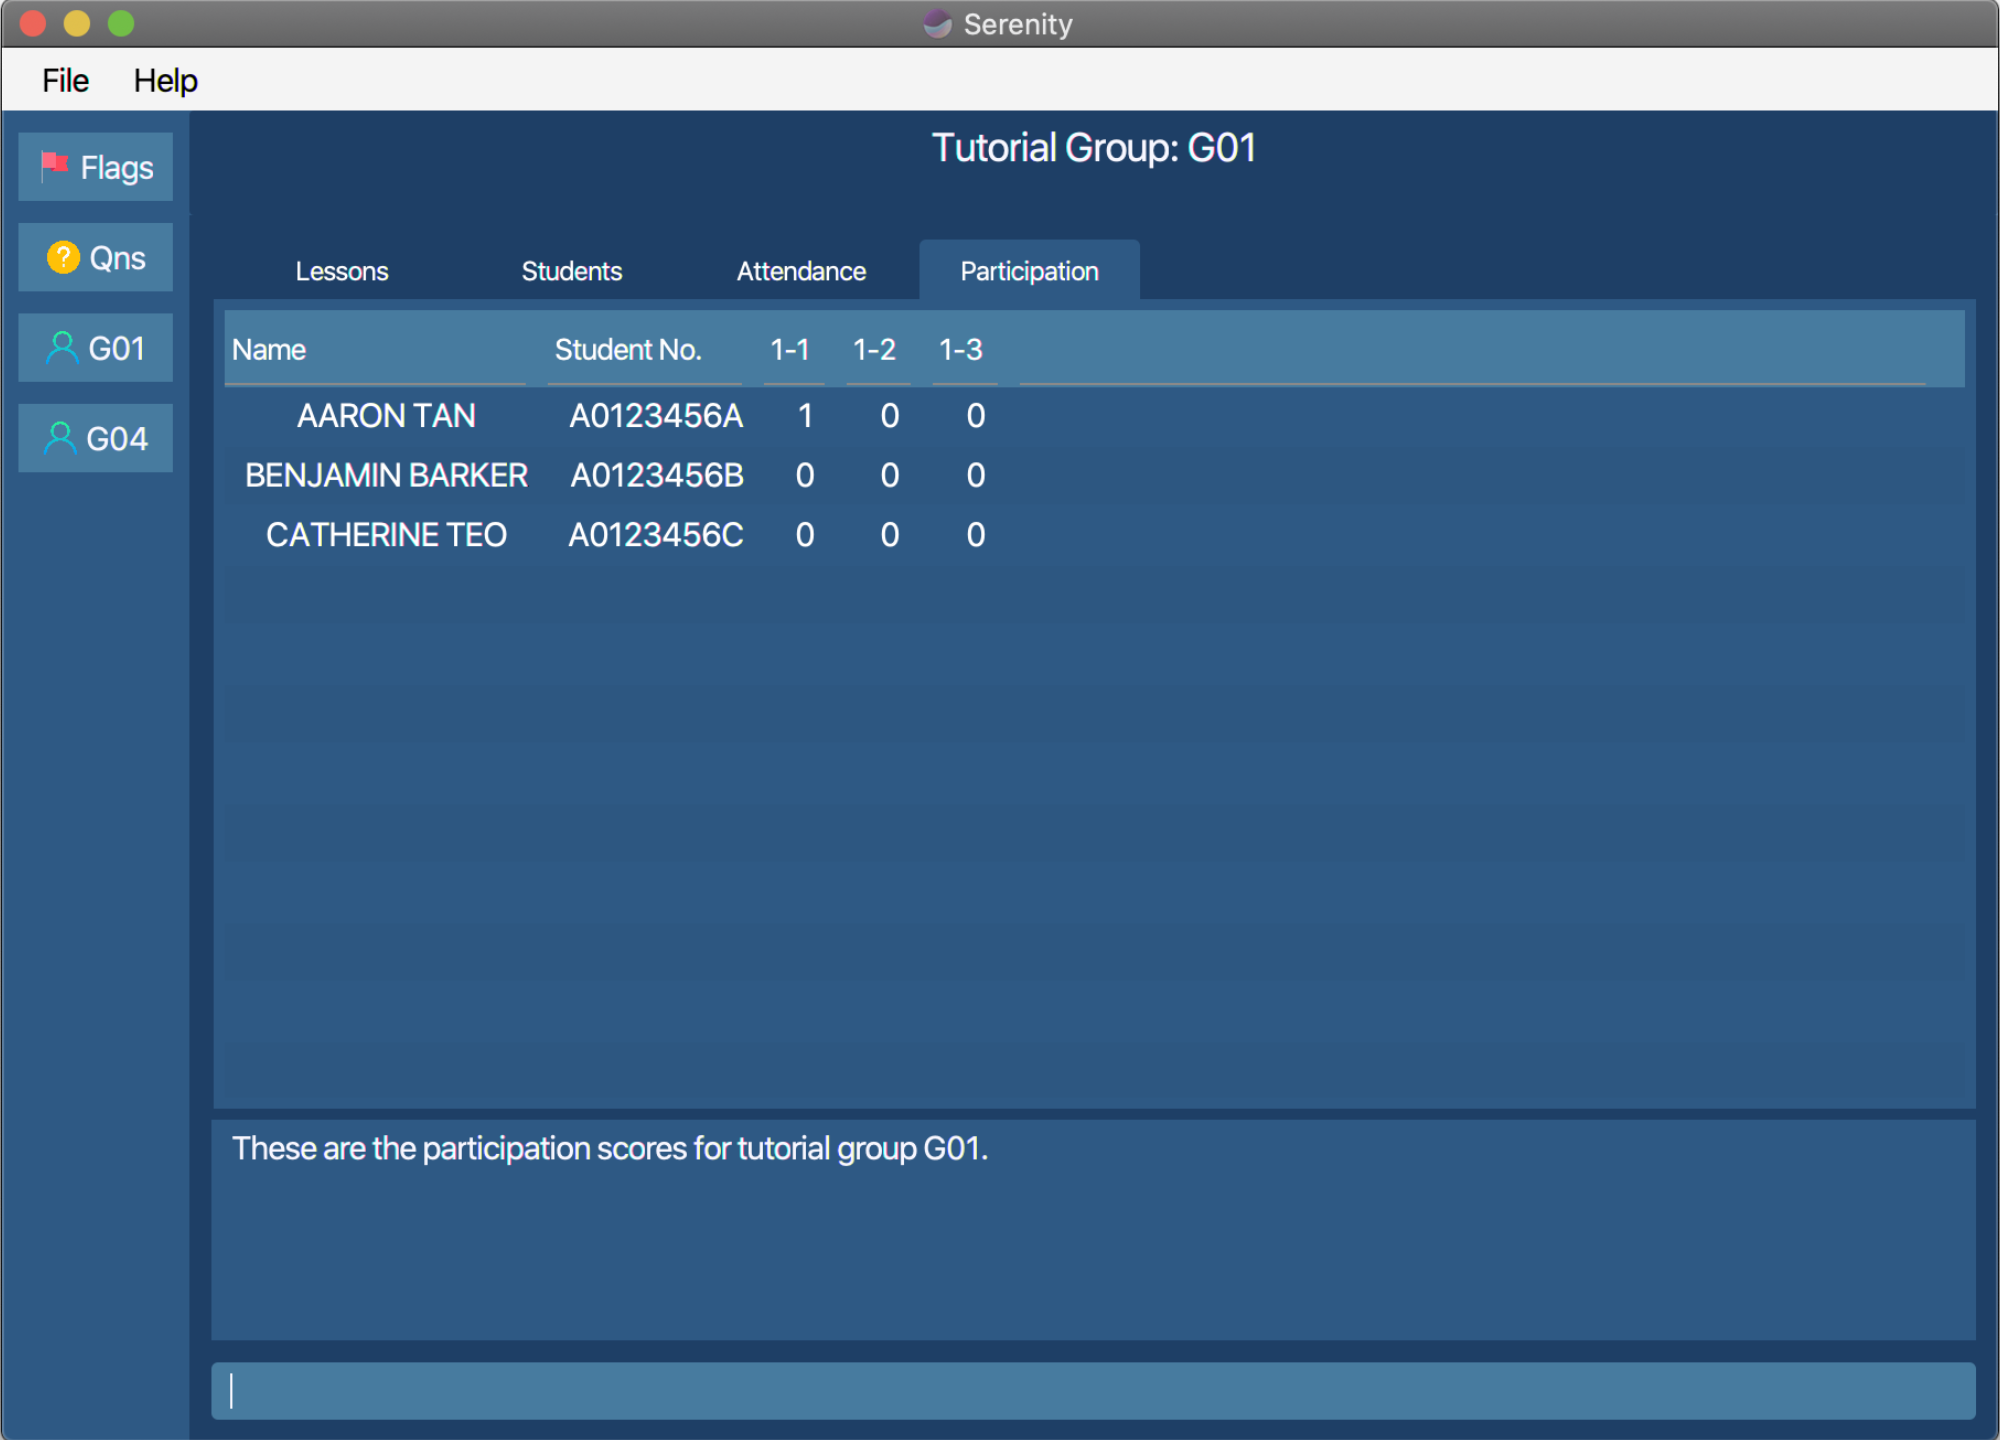
Figure 4.5.4.1 User interface for viewing tutorial participation score sheet.
4.5.5. View flagged attendance: viewflag
(Contributed by Rui En)
You can use this command to view students with their attendance marked as flagged across all tutorial lessons.
![]() Tip for the
Tip for the viewflag command:
You can easily navigate to the flagged attendance list by pressing the “Flag” button in the Side Bar as well! Pressing the button equals to typing this command.
![]() Tip for the
Tip for the viewflag command:
Instead of viewing flagged attendance across all tutorial lessons,
you can view flagged attendance for a specific tutorial lesson by
entering the tutorial lesson page using viewlsn and scrolling through the “Lesson” tab in the page.
Format:
viewflag
Example:
You want to view all flagged attendance.
Viewing flagged attendance:
- Type
viewflaginto the Command Box. - Press
Enterto execute.
Outcome:
- The Result Display will show a success message.
- The Data Display will update and display the list of students with flagged attendance across all tutorial lessons.
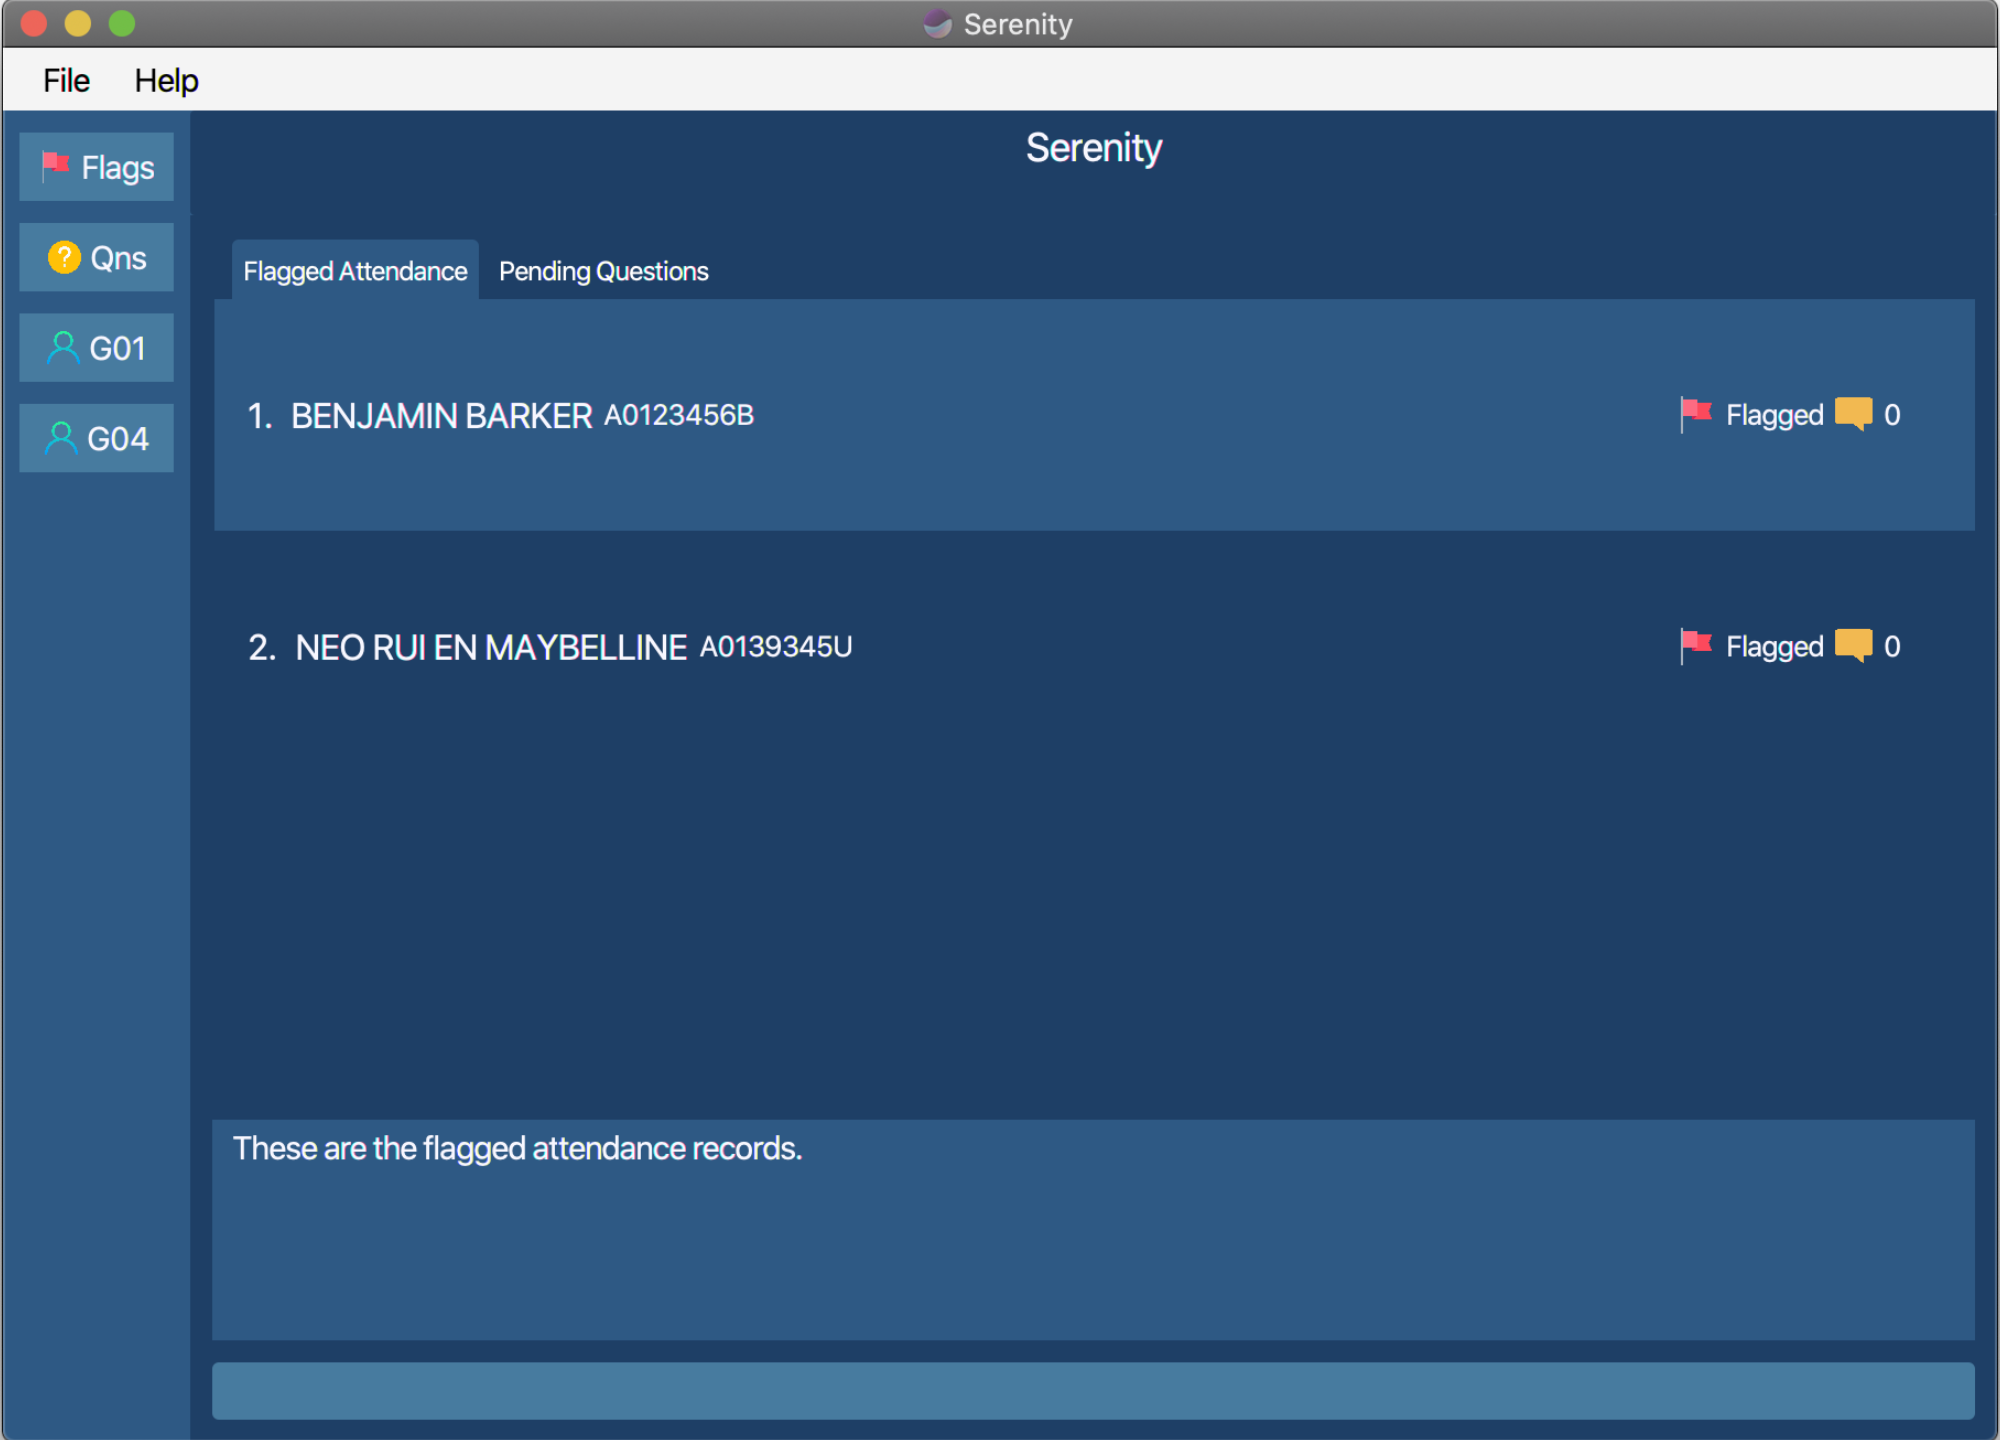
Figure 4.5.5.1 User interface showing the layout of the flagged attendance tab.
4.5.6. View pending questions: viewqn
(Contributed by Wen Jin)
You can use this command to view questions that were asked across all tutorial lessons and have yet to be addressed.
![]() Tip for the
Tip for the viewqn command:
You can easily navigate to the pending questions list by pressing the “Qns” button in the Side Bar as well! Pressing the button equals to typing this command.
![]() Tip for the
Tip for the viewqn command:
Instead of viewing pending questions across all tutorial lessons,
You can view questions for a specific tutorial lesson by
entering the tutorial lesson page using viewlsn and pressing the “Questions” tab in the page.
Format:
viewqn
Example:
You want to view all pending questions.
Viewing pending questions:
- Type
viewqninto the Command Box. - Press
Enterto execute.
Outcome:
- The Result Display will show a success message.
- The Data Display will update and display the list of pending questions asked across all tutorial lessons.
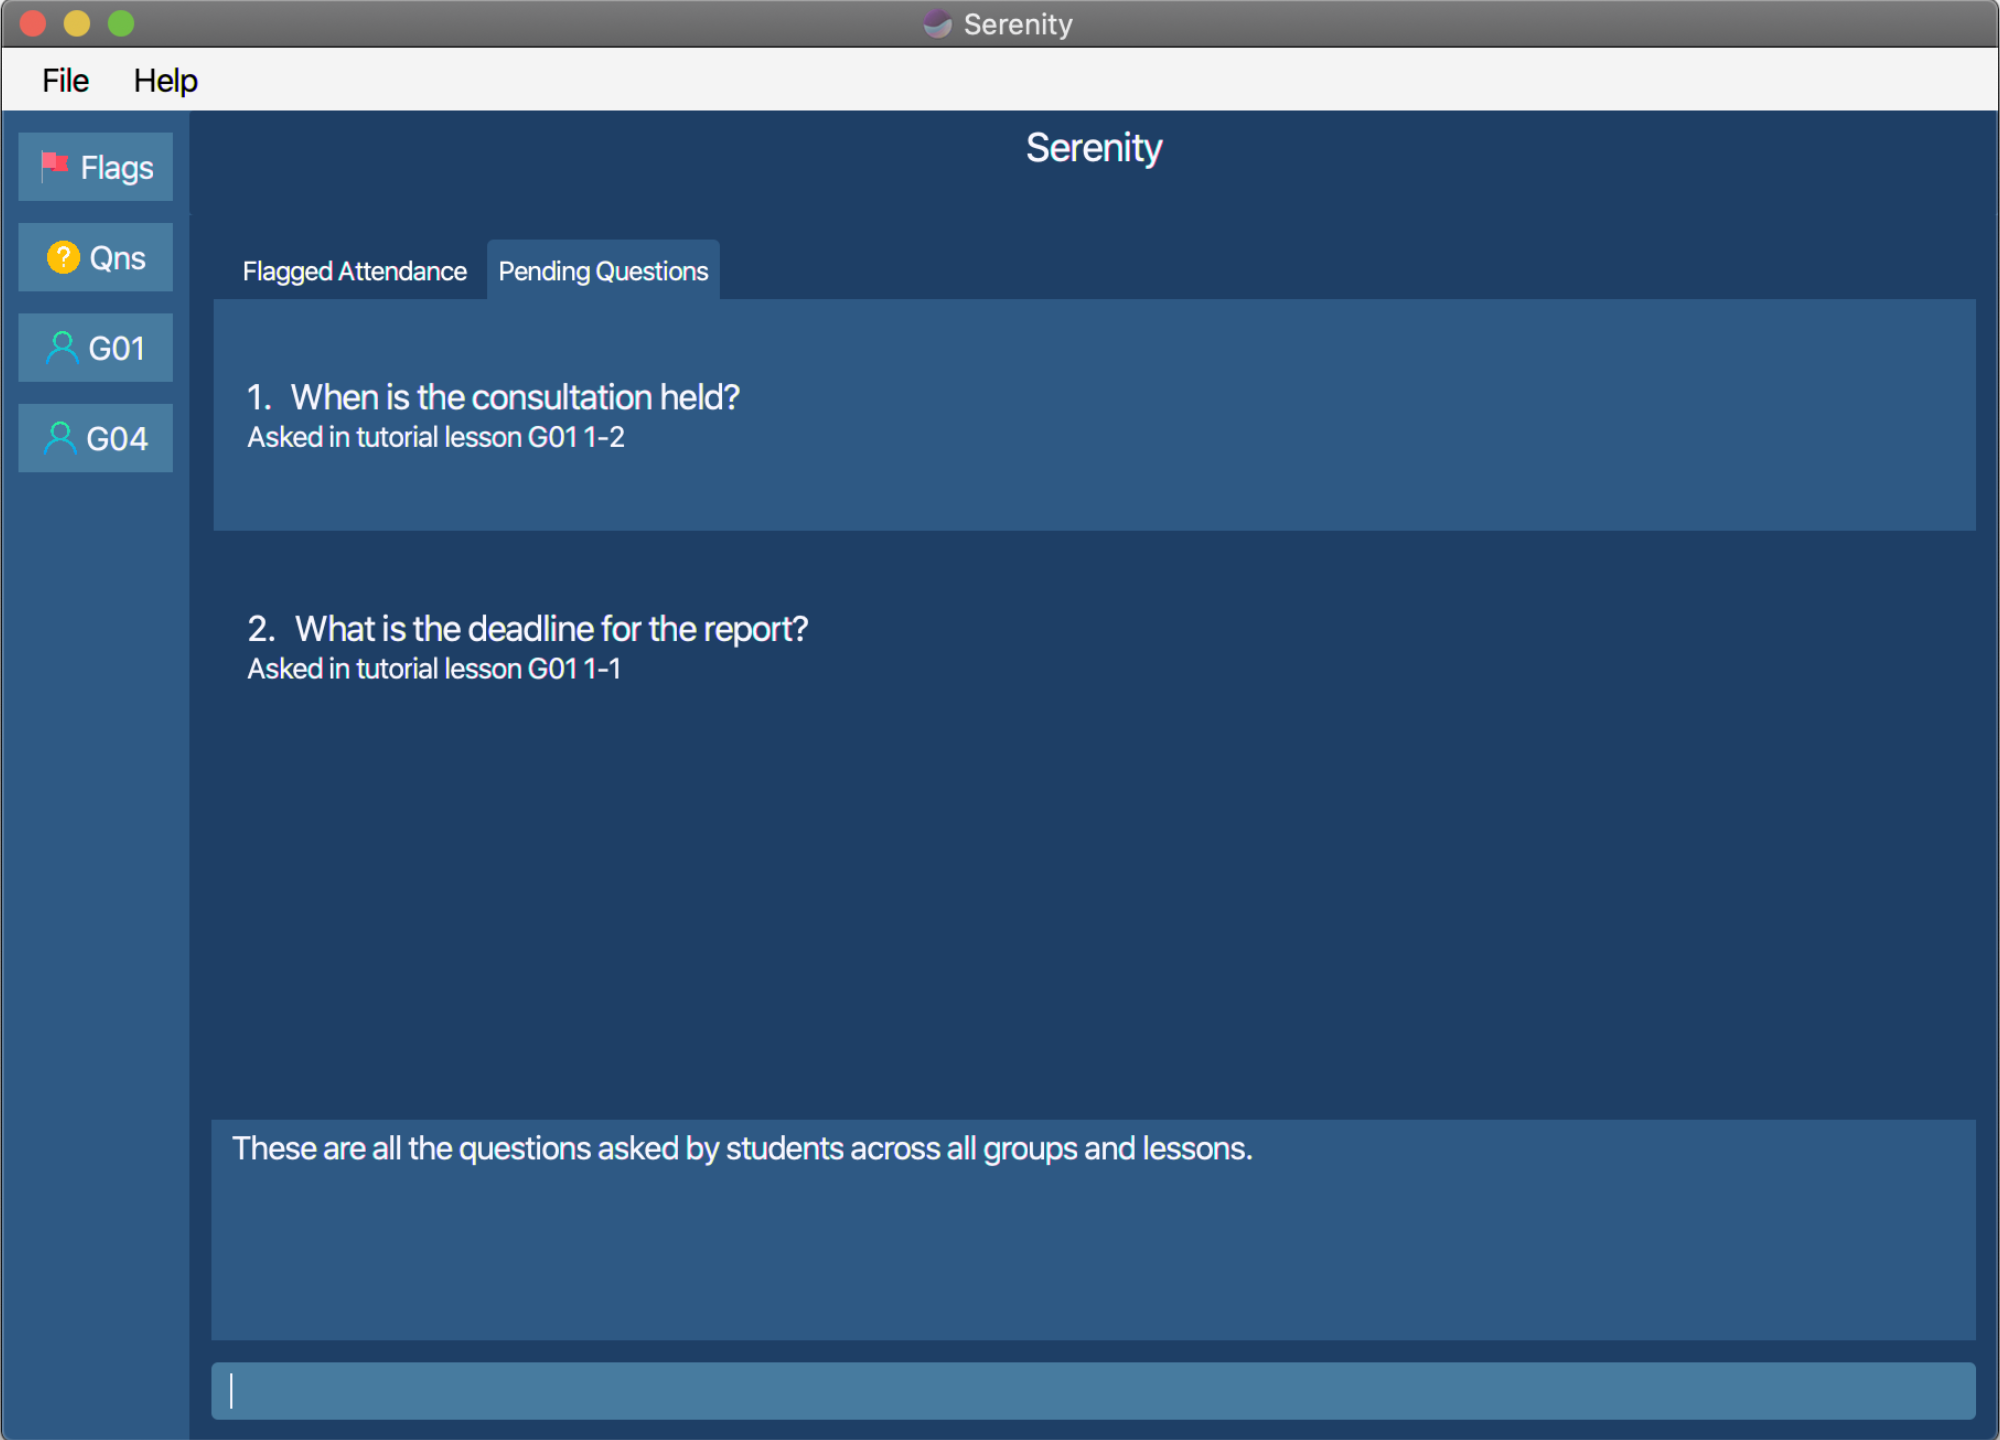
Figure 4.5.6.1 User interface for viewing questions.
(Contributed by Chun Yong)
5. FAQ
Q: How many tutorial groups can I manage in Serenity?
A: You can manage more than 1 tutorial groups in Serenity.
Q: How do I transfer my data to another computer?
A: By default, Serenity saves all your data in a folder named data. This folder can be found in the
home folder for your Serenity application. You can copy and transfer the data folder into the home folder of
your Serenity application on your other computer. Serenity will automatically load your data upon launching.
6. Command summary
(Contributed by The Serenity Team)
6.1. Setup commands
| Command | Example |
|---|---|
Add tutorial group addgrp grp/GROUP_NAME path/PATH_TO_XLSX
|
addgrp grp/G04 path/CS2101_G04.xlsx
|
Delete tutorial group delgrp grp/GROUP_NAME
|
delgrp grp/G01
|
Add tutorial lesson addlsn grp/GROUP_NAME lsn/LESSON_NAME
|
addlsn grp/G01 lsn/1-3
|
Delete tutorial lesson dellsn grp/GROUP_NAME lsn/LESSON_NAME
|
dellsn grp/G01 lsn/1-1
|
Add student addstudent grp/GROUP_NAME name/STUDENT_NAME matric/STUDENT_NUMBER
|
addstudent grp/G01 name/David Chong matric/A0123456D
|
|
Delete student - delstudent grp/GROUP_NAME name/STUDENT_NAME matric/STUDENT_NUMBER- delstudent INDEX grp/GROUP
|
- delstudent grp/G01 name/Aaron Tan matric/A0123456A - delstudent 1 grp/G01
|
6.2. Attendance taking commands
| Command | Example |
|---|---|
|
Mark a student as present - markpresent name/STUDENT_NAME matric/STUDENT_NUMBER- markpresent INDEX
|
- markpresent name/Aaron Tan matric/A0123456A - markpresent 1
|
|
Mark a student as absent - markabsent name/STUDENT_NAME matric/STUDENT_NUMBER- markabsent INDEX
|
- markabsent name/Aaron Tan matric/A0123456A- markabsent 1
|
Mark all students as present markpresent all
|
markpresent all
|
Mark all students as absent markabsent all
|
markabsent all
|
|
Flag attendance - flagatt name/STUDENT_NAME matric/STUDENT_NUMBER - flagatt INDEX
|
- flagatt name/Aaron Tan matric/A0123456A - flagatt 1
|
|
Unflag attendance - unflagatt name/STUDENT_NAME matric/STUDENT_NUMBER - unflagatt INDEX
|
- unflagatt name/Aaron Tan matric/A0123456A- unflagatt 1
|
Export attendance exportatt grp/GROUP_NAME
|
exportatt grp/G01 |
6.3. Participation marking commands
| Command | Example |
|---|---|
|
Add participation score - addscore name/STUDENT_NAME matric/STUDENT_NUMBER score/SCORE- addscore INDEX score/SCORE
|
- addscore name/Aaron Tan matric/A0123456A score/2 - addscore 1 score/2
|
|
Edit participation score - editscore name/STUDENT_NAME matric/STUDENT_NUMBER score/SCORE - editscore INDEX score/SCORE
|
- editscore name/Aaron Tan matric/A0123456A score/2 - editscore 1 score/2
|
|
Subtract participation score - subscore name/STUDENT_NAME matric/STUDENT_NUMBER score/SCORE - subscore INDEX score/SCORE
|
- subscore name/Aaron Tan matric/A0123456A score/2 - subscore 1 score/2
|
Export participation scores exportscore grp/GROUP_NAME
|
exportscore grp/G01
|
6.4. Question addressing commands
| Command | Example |
|---|---|
Add question addqn qn/QUESTION
|
addqn qn/What is the deadline for the report? |
Delete question delqn INDEX
|
delqn 1 |
Edit question editqn INDEX [grp/GROUP_NAME] [lsn/LESSON_NAME] [qn/QUESTION]
|
editqn 1 qn/Can you repeat the deadlines for all submissions? |
Find question findqn KEYWORD [MORE_KEYWORDS]...
|
findqn deadline |
6.5. Utility viewing commands
| Command | Example |
|---|---|
View tutorial group viewgrp grp/GROUP_NAME
|
viewgrp grp/G01 |
View tutorial lesson viewlsn grp/GROUP_NAME lsn/LESSON_NAME
|
viewlsn grp/G01 lsn/1-1 |
View attendance viewatt grp/GROUP_NAME
|
viewatt grp/G01 |
View participation score viewscore grp/GROUP_NAME
|
viewscore grp/G01 |
View flag viewflag
|
viewflag |
View questions viewqn
|
viewqn |